
Materials
A CAD assembly arrives with whatever colours the CAD system happened to store — often one flat grey for everything, sometimes hundreds of near-identical materials. The Materials window is where that becomes a machine you can read: steel that looks like steel, guarding you can see through, signal lamps that glow.
It docks on the right next to Quick Edit and has three sections — Asset, Presets and Edit. Every assignment is an undoable step on the document, so it lands in the GLB when you save.
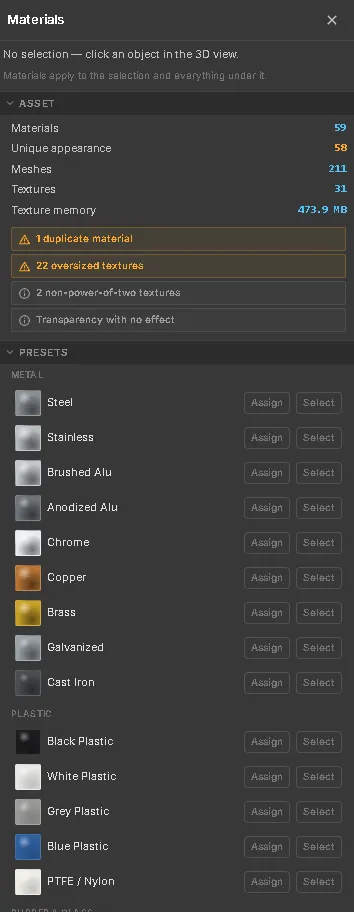
Asset — material health
Section titled “Asset — material health”The top section summarises what the asset is actually carrying:
| Figure | Meaning |
|---|---|
| Materials | Distinct material instances attached to the asset. |
| Unique appearance | How many of those actually look different. The gap between this and Materials is pure redundancy. |
| Meshes | Meshes carrying at least one material. |
| Textures | Distinct textures, counted by image rather than by reference. |
| Texture memory | Estimated GPU memory for those textures. |
Below the figures sit warnings, and every one of them is actionable — click a warning and the parts it refers to are selected in the 3D view, ready for you to assign something better.
- Duplicate materials — distinct materials that render identically. Merging them cuts draw calls and shrinks the exported GLB. On a freshly imported assembly this is usually the single highest-value cleanup.
- Oversized textures — 2048 px or larger. Machine parts rarely need more than 1K; downscaling cuts load time and GPU memory.
- Non-power-of-two textures — mipmapping and GPU texture compression may be unavailable for these.
- Transparency with no effect — materials flagged transparent at full opacity. They pay the sorting cost of transparency and gain nothing.
Geometry figures — triangles, draw calls — are deliberately not repeated here; they live in Settings → Dev Tools.
Presets — the industrial library
Section titled “Presets — the industrial library”The preset library covers what industrial assemblies are actually made of, grouped into six categories:
| Category | Contents |
|---|---|
| Metal | Steel, Stainless, Brushed Alu, Anodized Alu, Chrome, Copper, Brass, Galvanized, Cast Iron |
| Plastic | Black, White, Grey and Blue plastic, PTFE / Nylon |
| Rubber & Glass | Rubber, Conveyor Belt, Glass, Guard Panel, Amber Acrylic |
| Paint (RAL) | The RAL tones that show up on machine frames — 5015 Sky Blue, 7035 Light Grey, 7016 Anthracite, 9005 Jet Black, 9016 Traffic White, 1023 Traffic Yellow, 3020 Traffic Red, 6018 Yellow Green |
| Lamp / Signal | Red, Amber, Green, Blue and White signal colours, emissive so they read as lit |
| Custom | Your own saved presets |
Each row has two buttons:
- Assign applies the preset to the current selection.
- Select selects every object in the asset that already uses this material — the fastest way to find “all the parts that are still default grey”.
The swatch is an approximation drawn in CSS rather than a rendered sphere, so a long library stays cheap to display. The built-in values are tuned to read correctly under the viewer’s default lighting rather than to be physically canonical — a textbook mirror-finish steel renders as a near-black mirror in a single-environment scene, so the metals here sit at moderate roughness instead.
Edit — free PBR editing
Section titled “Edit — free PBR editing”The Edit section works on the current selection and seeds itself from it, so clicking a part and then dragging a slider starts from what that part already is.
| Property | Effect |
|---|---|
| Base color | The surface colour, picked from a colour field; the hex value is shown next to it. |
| Metalness | 0 for dielectrics (plastic, paint, rubber), 1 for bare metal. |
| Roughness | 0 is a mirror, 1 is fully matt. Machined metal reads well around 0.3–0.5. |
| Opacity | Below 1 the material is automatically flagged transparent — otherwise the change would be invisible. |
Changes apply to the whole selection as you make them, and each is an undoable step.
Saving your own preset
Section titled “Saving your own preset”Type a name into the field at the bottom of the Edit section and press Save preset. It appears under Custom and can be assigned like any built-in one; the delete button on the row removes it again.
Custom presets are stored in your browser, not in the document. They follow you between documents on the same machine, and a colleague opening the same model does not inherit them. In a private window, or with site data cleared, the custom list simply comes back empty — the built-in library is unaffected.
See also
Section titled “See also”- Editor overview — the workspace and the Quick Edit panel
- Importing CAD — where the material load comes from in the first place
- Mesh and structure — the other half of cleaning up an import
- Settings — visual settings and Dev Tools