
Planning window
Overview
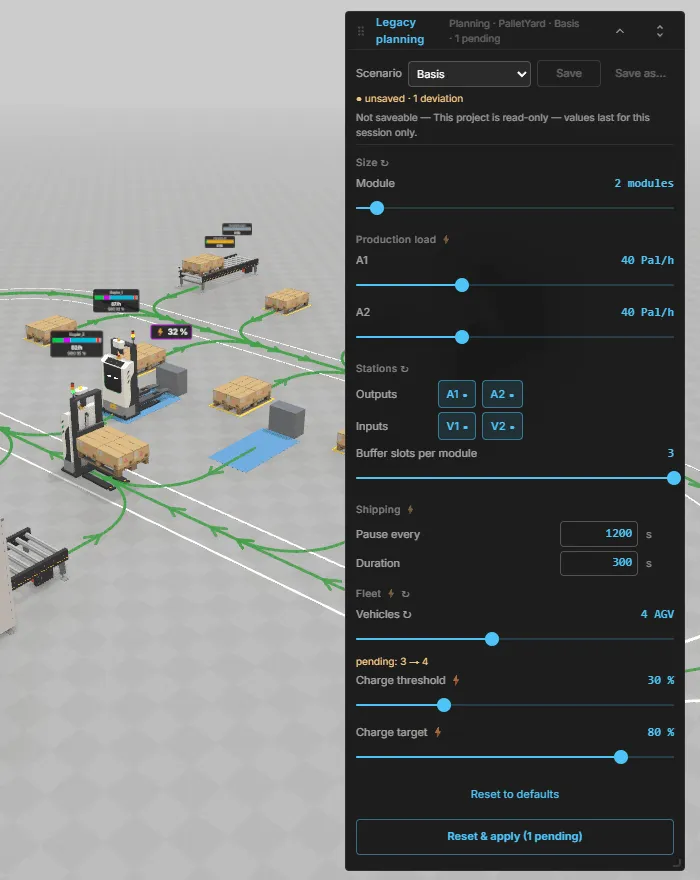
Section titled “Overview”Use the planning window to try different settings for your model, such as production rates, capacities or the number of vehicles. You see the available parameters in groups, change their values and save combinations as scenarios.
The window contains the settings you change. You review their effect in the Statistics window.
Opening the window
Section titled “Opening the window”Open a model with planning parameters. The planning window appears collapsed; its title reads Legacy planning and its subtitle names the model. You can also make it appear by adding a supported field from the Inspector.
The window is available in the viewer, DES, commissioning and planner workspaces. It is hidden in the asset editor. If you only see its title bar, expand it with the title-bar arrow. You can move, resize or collapse the window; it has no close button.
Parameters
Section titled “Parameters”You work with two kinds of parameter:
- Model planning parameters are settings prepared by the model author, with their own defaults, units, ranges and rules.
- Component fields are existing properties you add from the Inspector. Each selected object’s field becomes its own parameter. Its type, unit and choices come from that field, and changes require a reset.
Numbers with a minimum and maximum use sliders; release the slider to submit a value. Other numeric fields accept typed values: press Enter or leave the field to submit, or press Escape to discard your unfinished edit. Units appear beside numeric controls when provided.
Whole-number fields accept only integers. Numeric values must stay within the permitted range, and the model can reject combinations that violate its rules. A numeric entry that cannot be accepted shows an explanation beneath the field so you can correct it.
For a choice, click one of the available options. On/off settings use On and Off, or individual toggle chips when several related settings share a row.
The Display group, when present, controls overlay visibility. These view settings are remembered in your browser and are separate from scenario values and experiment factors.
Live and reset changes
Section titled “Live and reset changes”The symbol beside a group tells you when its values take effect. A group with both kinds also marks each parameter or chip row.
| Symbol | What happens when you change a value |
|---|---|
| ⚡ | A live change takes effect at the next simulation instant, without rebuilding the model. You can make it while the simulation runs. |
| ↻ | A reset change waits until you apply it and rebuild or reconfigure the model. |
A waiting value appears in its control with a pending: old → new line beneath it. Click that line to revert the pending change. A waiting toggle chip has a dashed outline. The title bar also shows the number of pending changes.
Click Reset & apply (n pending) to apply the waiting values and restart the simulation with the new settings. If the simulation is running, it stops for the rebuild and then resumes. During the operation, the button reads Rebuilding ….
With no pending changes, Rebuild & reset rebuilds the current configuration and starts a new run. The ordinary simulation reset restarts the existing configuration and leaves pending reset changes waiting.
Click Reset to defaults to restore a parameter source’s defaults. If several sources are present, the button includes the source’s name. Live defaults follow the live-change timing; reset defaults remain pending until you apply them. The button is disabled when all its values, including pending ones, already match their defaults. For added component fields, the default is the field’s document value captured when it becomes a planning parameter.
For a repeatable DES run, use the same starting model, seed and parameter changes at the same simulated times. A live change is applied after all model events at that instant, so it does not interrupt those events halfway through. Machine and browser performance measurements can still differ.
Scenarios
Section titled “Scenarios”Use Scenario at the top of the window to select a stored set of planning values.
- Save updates the active scenario in the document. It becomes available when you have unsaved changes and the document can be saved.
- Save as… opens a name field. Enter a name and click Save to store the current values under that name and make it active. An existing name shows Replaces the stored scenario.
- Selecting another scenario loads its values through the same live and reset rules. Apply any pending reset values before evaluating the new configuration.
- If you have unsaved changes, confirm with Switch to discard them and change scenario, or Cancel to keep working.
The status line shows ● unsaved or saved, followed by the number of deviations from defaults. This count is not a comparison with another scenario. Saving includes pending values, but does not apply them to the running simulation.
There is no side-by-side scenario comparison in this window. Use experiments and runs to compare results from different parameter combinations.
Changes are not saved automatically. If the document cannot be written, Not saveable explains why and both save buttons are disabled. Your changes then last for the current session.
Adding fields from the Inspector
Section titled “Adding fields from the Inspector”- Select an object and find its component field in the Inspector.
- On a supported field row, click the tuning icon with the tooltip Show in planning window.
- Change the value in the planning window, then use Reset & apply (n pending) to apply it.
The action is available outside the asset editor for supported editable numbers, integers, on/off values and fixed choices whose component can apply them on reset or rebuild. Text, object references, signals, read-only and deprecated fields do not qualify. If a field cannot be added, the tooltip gives the reason.
To remove a field, click the same Inspector icon, now labelled Remove from planning window. Adding and removing fields do not create an Undo step; use the toggle to reverse the selection.
Removing a field also removes its stored planning values from every scenario in the current session. It leaves the component’s last applied value in place. Adding it again does not recover those removed scenario values. Use Save to keep the field selection with the document.
Key figures
Section titled “Key figures”Click Statistics in the analysis group of the side toolbar. Planning key figures appear in a section named for the model; select its tab when several sections are available. The available figures and units depend on the model.
The Performance section reports machine and browser measurements, such as frame rate and memory use. These measurements are marked as non-deterministic and can vary between otherwise identical runs.
See The Statistics window for the shared window and its other statistics.
Working with experiments
Section titled “Working with experiments”Experiments use the same model planning parameters as factors and can also vary supported component fields. You do not have to add every experiment factor to the planning window.
Apply or revert pending values before starting a batch. While the batch runs, the planning window is read-only: its parameter controls, scenario controls and reset buttons are unavailable. After the batch, the planning values from before it are restored.
See Experiments and runs for factors, repeated runs and result comparison.