
AI Assistant (Bridge)
The AI Bridge is the connection between the twin running in your browser and an AI assistant running on your machine. When enabled, it lets the assistant find parts, read drives and take screenshots. With your permission, the assistant can also jog axes, set signals, build layouts and connect PLC signals to the model.
The bridge itself runs locally. The viewer, realvirtual CONNECT and the bridge between them are on your machine, and the model file is not uploaded. The assistant is different: an assistant such as Claude Code sends what it reads from the twin — names, values, screenshots — to its AI service to work with it, like any other request you give it.
Switching it on
Section titled “Switching it on”Open the panel from the AI Bridge button in the left bar, or from Settings ▸ AI. On a phone or tablet the settings tab is the only route.
Two things can happen before the panel appears.
- No gateway answered. CONNECT hosts the connection, so the click offers the CONNECT download instead of an empty panel. For a viewer without CONNECT, see Without a gateway.
- First time on this device. A one-time dialog lists what an assistant can access: the whole scene, every PLC signal (including write access) and the simulation. Access from this machine needs no configuration. Access from another machine requires a valid API key. Got it and Configure… record your acknowledgement. Not now closes the dialog without agreement.
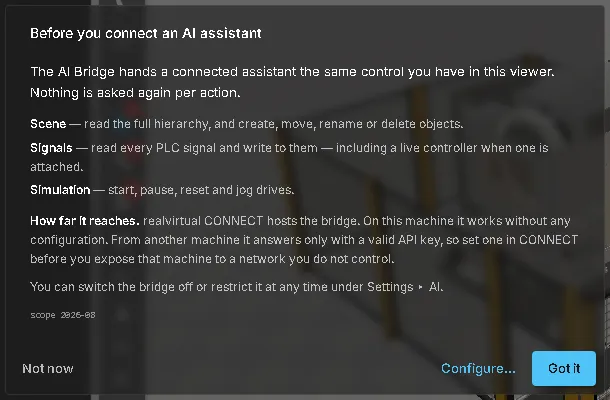
The device stores your acknowledgement only after you give it explicitly. If the bridge’s access expands, it asks again.
Reading the panel
Section titled “Reading the panel”The status section reports the whole chain, including the browser connection and the attached assistant.
| Row | What it tells you |
|---|---|
| Browser → Bridge | The link between this browser tab and the bridge: connected, reconnecting, disconnected or disabled |
| Target | Where the bridge connects to — normally CONNECT on this machine |
| AI client | Which assistant is attached |
| Last AI activity | How long ago the assistant last did something |
| Tools | How many tools this viewer is offering |
| Port | The port this browser is talking to |
| Bridge | The bridge process: id, port and how long it has been running — useful when two are running by accident |
Below the status:
- Port is the port of the bridge. Leave it at 5100 — that is CONNECT. Change it only for the fallback described below.
- Pause / Resume stops and resumes accepting connections.
- Shutdown asks the bridge process to exit. It can only be restarted by the assistant, not from the browser.
- Registered Tools lists the tools currently available to the assistant. Server Log shows its activity.
Seeing that it is working
Section titled “Seeing that it is working”The AI Bridge button uses the accent colour while connected. Its tooltip shows the connection state. During assistant activity, an indicator beside the button names the operation, such as AI · Drive list. It clears a few seconds after the last operation.
Connecting an assistant
Section titled “Connecting an assistant”CONNECT’s MCP endpoint is on by default, so there is usually nothing to enable on the gateway side. If it was switched off, turn it on in the CONNECT tray menu under MCP server ▸ Enabled and restart CONNECT. Register the endpoint with your assistant, restart the assistant, then switch the bridge on in the panel, with the Port left at 5100.
Claude Code, and the Claude Code desktop application, speak to the endpoint directly:
{ "mcpServers": { "realvirtual-CONNECT": { "type": "http", "url": "http://localhost:5100/mcp" } }}Claude Desktop (classic) can only launch local programs, so it needs a small relay in between. It requires Node.js on the machine:
{ "mcpServers": { "realvirtual-CONNECT": { "command": "npx", "args": ["-y", "mcp-remote", "http://localhost:5100/mcp", "--allow-http"] } }}In Unity, Tools ▸ realvirtual ▸ Settings ▸ Configure Claude Desktop MCP writes both configurations for you.
Connections from a cloud assistant are not supported because they would require public access to the gateway.
Without a gateway
Section titled “Without a gateway”For a standalone viewer without CONNECT, use the fallback Node bridge. Build it once from the delivered sources and register it with the assistant in place of the endpoint above. Set the panel’s Port to 18714 for Claude Desktop or 18715 for Claude Code.
Use CONNECT where available. It shares the delivered HMI’s origin, needs no Node.js or build step, and includes the gateway’s tools.
Notes on a node
Section titled “Notes on a node”An assistant can record a finding on the node it belongs to, such as an axis’s role, its actual limits or a misleading part name.
Select an annotated node to read its note in the property inspector. The header shows the date, author and confidence level. Annotated nodes have a marker in the hierarchy.
- They are written by an assistant, not by you. The section is read-only, with no edit field or delete button.
- The confidence line matters. observed means measured or seen. inferred and unverified indicate uncertain findings. Notes record findings; they are not specifications.
- The date is the only staleness signal. Nothing checks a note against the model. An old note next to a changed machine stays where it is.
- The note travels inside the document. It is part of the GLB, so it follows the file — but a re-export from Unity drops it.
AI diagnosis uses notes when you ask about an annotated node. Its answer draws on the manual, live state and findings from earlier sessions.
Quick Start
Section titled “Quick Start”- Start CONNECT on the same machine.
- Register the endpoint with your assistant and restart it.
- Open AI Bridge in the viewer, read the one-time notice, and switch the bridge on.
- Check that AI client names your assistant and that Tools is not zero.
- Start with a read-only request, such as “list the drives in this model”, and watch the activity indicator.
See also
Section titled “See also”- AI clients (MCP) — what an assistant can do, and the gateway switches that govern it
- Settings — the AI tab
- AI diagnosis — the other AI feature, which answers from your machine documentation
- Signal binding — the manual counterpart of assistant-driven binding