
Stereo output shows a separate image for each eye on a compatible 3D display. Stereo output is part of realvirtual Commercial as a Beta (since 6.6.0). The supported layout is Side by Side (Half) — 3D TV: the left and right eye images each occupy half the output width, and the TV expands them for viewing. Top-Bottom and full-width side-by-side are listed in the settings but are not available yet; selecting one shows a notice.
Start and stop
Section titled “Start and stop”- Load a model and move the browser window to the 3D display.
- Open Settings ▸ Stereo 3D and select Side by Side (Half) — 3D TV under Layout.
- When Status reads Ready — start fullscreen, click Start Fullscreen (F) or press F.
- Set the TV’s 3D mode to Side by Side. The viewer displays Active while stereo is running.
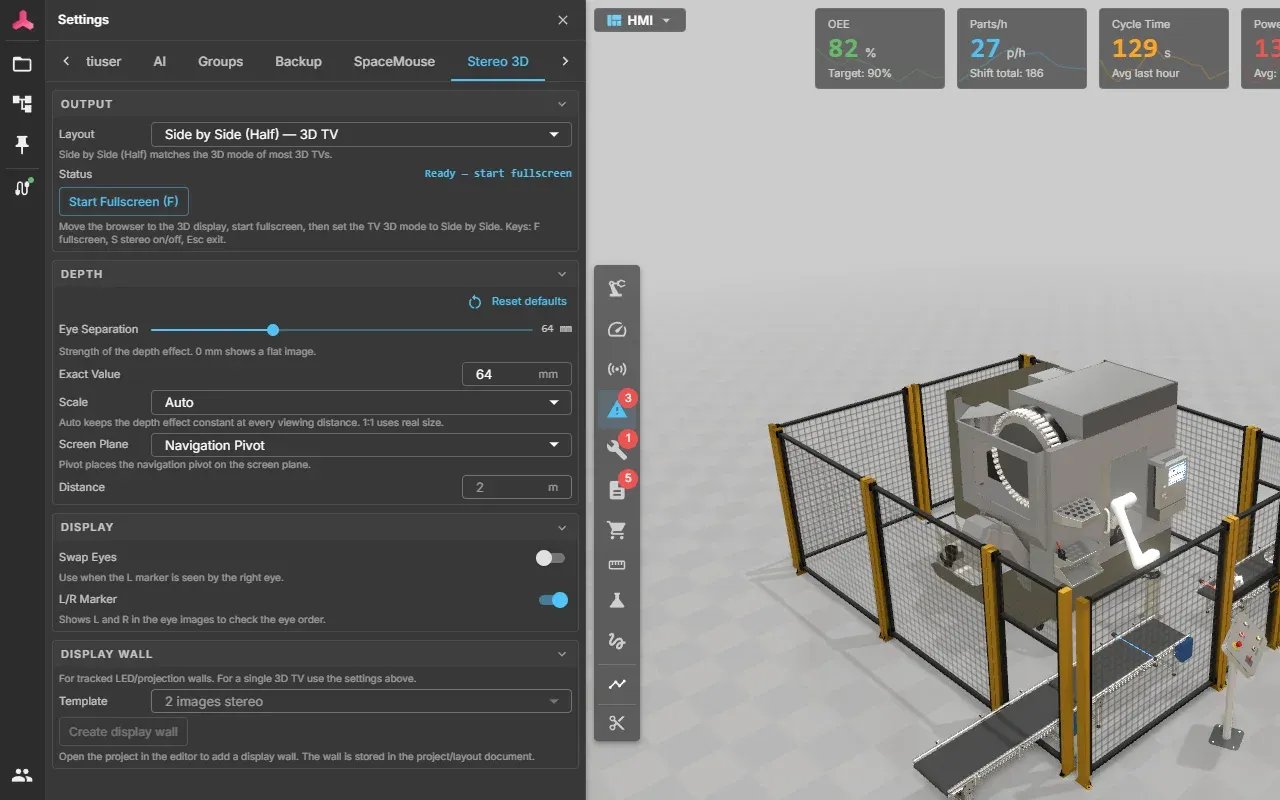
You can also open the viewer with ?stereo=sbs. This selects the layout and opens its settings; it waits for your fullscreen gesture. If fullscreen is refused, click Start Fullscreen (F) again.
| Key | Effect |
|---|---|
| F | Start fullscreen when stereo is ready; leave active stereo and return to ready |
| S | Switch the selected stereo layout off; restore the last selected layout when off, ready for a fullscreen start |
| Esc | Leave active stereo; when already ready, switch the layout off |
Stop Stereo also leaves active stereo. Leaving fullscreen restores the normal viewer interface and selection. These shortcuts are ignored while typing in a field or holding Ctrl, Cmd or Alt. F retains its normal framing action when stereo is off.
The Display wall section at the bottom of this tab is for tracked LED or projection walls with head tracking; see Display Walls. For a single 3D TV, use the settings above it.
Depth and eye order
Section titled “Depth and eye order”| Setting | Default | What it controls |
|---|---|---|
| Eye Separation / Exact Value | 64 mm | 0–200 mm; larger values increase the depth effect, 0 gives a flat image |
| Scale | Auto | Auto scales the eye separation with viewing distance; 1:1 uses the separation in real metres |
| Screen Plane | Navigation Pivot | Places the navigation pivot at screen depth; Fixed Distance uses the Distance field instead |
| Distance | 2 m | 0.2–1000 m; editable with Fixed Distance |
| Swap Eyes | Off | Exchange the two output images if the eye order is reversed |
| L/R Marker | On | Show L and R in the eye images to check eye order |
Reset defaults restores the depth and display defaults without changing the selected layout. These preferences are saved in the browser; the selected layout is not restored from browser storage on the next visit. The URL can override eye separation and order, for example ?stereo=sbs&ipd=64&swap=1.
With Navigation Pivot, the pivot lies on the screen plane. Objects in front of that plane appear in front of the screen; objects beyond it appear behind the screen. Both eyes look in parallel directions. Their view boundaries shift sideways so the images agree on the screen plane.
Samsung and other 3D TVs
Section titled “Samsung and other 3D TVs”Use a TV with a Side by Side 3D mode and glasses compatible with that TV. Move the browser onto the TV before starting fullscreen; the viewer does not offer a TV-selection control.
- Start the viewer as described above, then enable the TV’s Side by Side mode and put on the glasses.
- Leave L/R Marker on. Close one eye at a time: the left eye should see L, and the right eye R. If they are reversed, enable Swap Eyes.
- Keep Screen Plane on Navigation Pivot and inspect parts on either side of that depth. Orbit and zoom to check the depth while navigating.
- Start with Eye Separation at 64 mm and reduce it if the depth effect is too strong.
- Press Esc and check that the regular interface and selection return.
The TV’s own menu and glasses pairing depend on its model. A TV without a Side by Side 3D mode cannot decode this output.
Limits
Section titled “Limits”- Stereo requires WebGL and a perspective camera. It is unavailable with WebGPU, an active XR session or the Omniverse render backend. Stop display-wall output before starting stereo.
- Screen-space post-processing, including ambient occlusion and bloom, is bypassed.
- Gaussian splats are not visible in live stereo; the settings show a notice when they are present.
- Screenshots and video captures use the normal mono camera.
- Mouse navigation remains available. Selecting, measuring or manipulating objects through the viewport is blocked during stereo; leave stereo to use these tools.
See also
Section titled “See also”- Navigation & Controls
- Settings
- Display Walls — measured wall geometry and head tracking