
Keba Interface (Pro)
The Keba Interface provides high-performance communication with Keba automation controllers.
Overview
Section titled “Overview”The Keba Interface enables real-time bidirectional data exchange between Unity simulations and Keba automation controllers. This Professional-only interface supports automatic variable import, pattern-based signal direction detection, and efficient variable subscription for optimal performance.
The interface connects to Keba controllers using standard network communication protocols. Variables can be automatically imported from the controller or manually configured as needed.
Installation
Section titled “Installation”The Keba Interface is included in realvirtual Professional and can be added to your scene through:
- Menu Method: Select Tools > realvirtual > Add Interface > Keba
- Manual Method: Add the
KebaInterfacescript to an empty GameObject
The interface files are located at: Assets/realvirtual/Interfaces/Keba/
Properties
Section titled “Properties”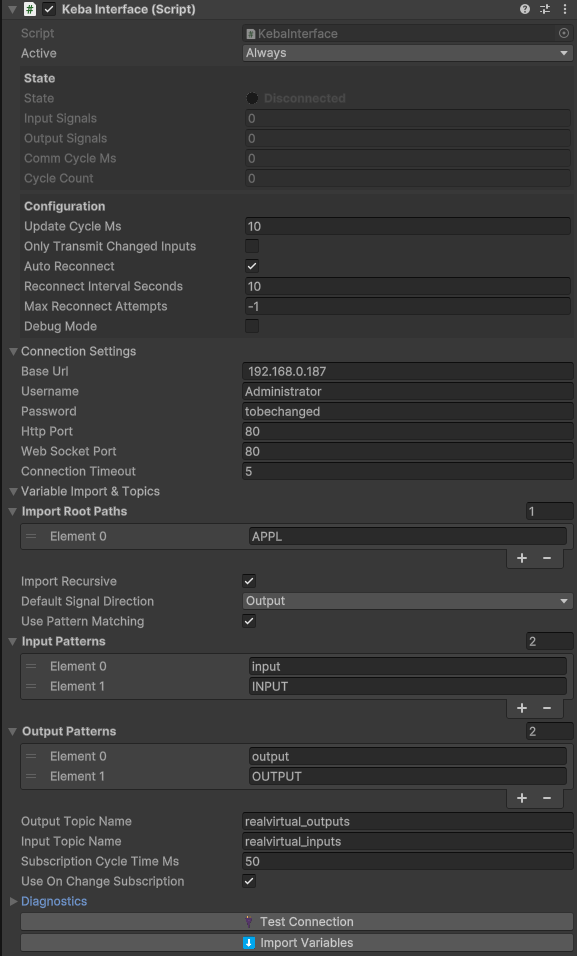
Connection Settings
Section titled “Connection Settings”- Base URL (string): IP address or hostname of the Keba automation controller. Default: “192.168.1.100”
- Username (string): Username for authentication with the Keba controller. Default: “Administrator”
- Password (string): Password for authentication with the Keba controller. Default: “tobechanged”
- HTTP Port (int): HTTP port number for controller communication. Default: 80
- WebSocket Port (int): Port number for variable service communication. Default: 80
- Connection Timeout (float): Connection timeout in seconds. Default: 5.0
Variable Import & Topics
Section titled “Variable Import & Topics”- Import Root Paths (list): Root paths to import variables from (e.g., “SYS”, “PLC”, “SYS.HW”). Default: [“SYS”]
- Import Recursive (boolean): Import variables recursively from subdirectories. Default: true
- Default Signal Direction (enum): Default signal direction for imported variables (Input = Unity→Keba, Output = Keba→Unity). Default: Output
- Use Pattern Matching (boolean): Use pattern matching on variable names to automatically determine signal direction. Default: true
- Input Patterns (list): Name patterns to identify input signals (Unity→Keba). Default: [“input”, “INPUT”]
- Output Patterns (list): Name patterns to identify output signals (Keba→Unity). Default: [“output”, “OUTPUT”]
- Output Topic Name (string): Topic name for subscribing to output variables from Keba controller. Default: “realvirtual_outputs”
- Input Topic Name (string): Topic name for sending input variables to Keba controller. Default: “realvirtual_inputs”
- Subscription Cycle Time Ms (int): Update cycle time in milliseconds for variable subscriptions. Default: 20
- Use OnChange Subscription (boolean): Subscribe to variable changes only when they occur for better performance. Default: true
Diagnostics
Section titled “Diagnostics”- WebSocket Queue Size (int): Current number of messages waiting in the communication queue (read-only)
Controller Configuration
Section titled “Controller Configuration”Enabling Variable Service
Section titled “Enabling Variable Service”Configure your Keba automation controller to accept connections:
- Controller Settings:
- Enable variable service in controller configuration
- Configure HTTP port (typically 80) for communication
- Configure communication port (typically 80) for variable access
- Ensure user account has appropriate permissions for variable access
- Network Settings:
- Ensure controller and Unity PC are on the same network
- Configure static IP address for reliable connectivity
- Test connectivity with ping command
- Security Settings:
- Use strong passwords instead of default “tobechanged”
- Configure user permissions for variable read/write access
- Ensure firewall allows communication on configured ports
Variable Organization
Section titled “Variable Organization”For optimal performance and organization:
- Structure Variables: Organize variables in logical paths (e.g., SYS for system variables, PLC for program logic)
- Use Naming Conventions: Include “input” or “output” in variable names for automatic direction detection
- Group Related Variables: Place related variables in same path for efficient batch operations
Manual Signal Creation
Section titled “Manual Signal Creation”For precise control over signal configuration, you can manually create individual signals. The interface automatically maps signals to Keba variables through metadata.
Basic Setup Process
Section titled “Basic Setup Process”- Add Interface to Scene:
- Create an empty GameObject and name it “KebaController”
- Add the KebaInterface component
- Configure the connection settings (IP address, username, password)
- Create Signal GameObject:
- Right-click the interface GameObject in the hierarchy
- Select Create Empty to add a child GameObject
- Name it descriptively (e.g., “ConveyorMotorStart”, “SystemStatus”, “TemperatureReading”)
- Add Signal Component:
- Select the signal GameObject
- Add the appropriate signal component:
- PLCInputBool - Send boolean values to Keba controller
- PLCOutputBool - Read boolean values from Keba controller
- PLCInputFloat - Send numeric values to Keba controller
- PLCOutputFloat - Read numeric values from Keba controller
- Configure Signal Properties:
- Name: Set to match the Keba variable name exactly
- Comment: Add documentation describing the signal purpose
- Set Keba Variable Metadata:
- The interface requires “KebaVariable” metadata to map signals to controller variables
- This is typically set automatically through variable import
- For manual setup, use the Signal Inspector metadata section
Variable Import
Section titled “Variable Import”The Variable Import feature allows automatic signal creation from Keba controller variables, dramatically reducing setup time for large systems.
Import Process in Unity
Section titled “Import Process in Unity”- Configure Connection Settings:
- Set the Base URL to your Keba controller IP
- Enter valid Username and Password
- Verify HTTP Port matches controller configuration
- Configure Import Settings:
- Import Root Paths: Specify variable paths to import (e.g., “SYS”, “PLC”)
- Import Recursive: Enable to import from subdirectories
- Pattern Matching: Configure patterns to automatically detect signal directions
- Default Signal Direction: Set fallback direction for variables that don’t match patterns
- Test Connection:
- Click 🔌 Test Connection button to verify controller access
- Verify authentication and variable access work correctly
- Address any connection issues before importing
- Execute Import:
- Click ⬇️ Import Variables button to start the import process
- Monitor Unity Console for import progress and any warnings
- Review created signals in the hierarchy
Variable Path Examples
Section titled “Variable Path Examples”| Path | Description | Typical Contents |
|---|---|---|
| SYS | System variables | Controller status, diagnostics |
| PLC | PLC program variables | User program inputs/outputs |
| SYS.HW | Hardware variables | I/O module status, hardware diagnostics |
| SYS.CPU | CPU variables | CPU load, memory usage |
Pattern Matching
Section titled “Pattern Matching”The interface can automatically determine signal direction based on variable names:
- Input Patterns (Unity→Keba): Variables containing “input” or “INPUT” become input signals
- Output Patterns (Keba→Unity): Variables containing “output” or “OUTPUT” become output signals
- No Pattern Match: Uses the Default Signal Direction setting
Post-Import Organization
Section titled “Post-Import Organization”After successful import, you’ll have:
- Organized signals: Each variable becomes a properly configured signal GameObject
- Correct direction: Automatically determined from patterns or default setting
- Metadata mapping: “KebaVariable” metadata links signals to controller variables
- Ready-to-use signals: Immediately available for connection to simulation components
Supported Data Types
Section titled “Supported Data Types”The interface supports standard Keba automation data types:
| Keba Type | realvirtual Signal | Description | Usage |
|---|---|---|---|
| BOOL | Bool | Boolean values | Digital inputs/outputs, status flags |
| STRING | Text | Text strings | Messages, status text |
| DWORD, UDINT | Int | 32-bit unsigned integers | Counters, large values |
| DINT, INT | Int | Signed integers | Position values, temperatures |
| UINT, WORD | Int | 16-bit unsigned integers | Small counters, status codes |
| BYTE | Int | 8-bit unsigned integers | Small values, flags |
| REAL | Float | 32-bit floating point | Speed values, measurements |
| LREAL | Float | 64-bit floating point | High-precision values |
Troubleshooting
Section titled “Troubleshooting”Connection Issues
Section titled “Connection Issues”Cannot connect to controller:
- Verify controller IP address is correct
- Check HTTP and WebSocket ports match controller configuration
- Test with ping command:
ping 192.168.1.100 - Verify firewall settings allow communication on configured ports
- Check controller is powered on and network accessible
Authentication failures:
- Verify username and password are correct
- Check user account has appropriate permissions
- Ensure account is not locked or expired
- Try using default credentials if changed recently
Import Issues
Section titled “Import Issues”Variable import fails:
- Use Test Connection button to verify controller access first
- Check Import Root Paths exist in controller
- Verify user permissions allow variable enumeration
- Review Unity Console for specific error messages
No variables found:
- Verify specified paths contain variables
- Check Import Recursive setting if variables are in subdirectories
- Ensure controller has variables configured in specified paths
Communication Issues
Section titled “Communication Issues”Slow update rates:
- Reduce Subscription Cycle Time Ms for faster updates
- Enable Use OnChange Subscription for event-driven updates
- Check network latency between Unity and controller
- Monitor communication queue size for bottlenecks
Communication disconnections:
- Check network stability and bandwidth
- Increase Connection Timeout if network is slow
- Monitor controller CPU load during high-frequency updates
- Review Unity Console for specific communication errors
Performance Issues
Section titled “Performance Issues”High communication queue size:
- Indicates messages are arriving faster than Unity can process
- Reduce variable subscription rate in controller
- Increase Unity’s Update Cycle Ms setting
- Consider subscribing to fewer variables simultaneously
Memory usage increases:
- Check for message queue buildup in diagnostics
- Verify proper connection cleanup on interface shutdown
- Monitor Unity Profiler for memory allocation patterns
See Also
Section titled “See Also”- Signal Manager - Managing and organizing signals
- Signal Importer Exporter - Import and export signal configurations
- Custom Interfaces - Creating custom interfaces
- MQTT Interface - Similar network-based communication interface
External Resources
Section titled “External Resources”- Keba Automation - Official Keba automation products and documentation
© 2025 realvirtual GmbH https://realvirtual.io - All rights reserved. No part of this publication may be reproduced, distributed, or transmitted in any form or by any means, including printing, saving, photocopying, recording, or other electronic or mechanical methods, without the prior written permission of the publisher.