
LogicSteps (Pro)
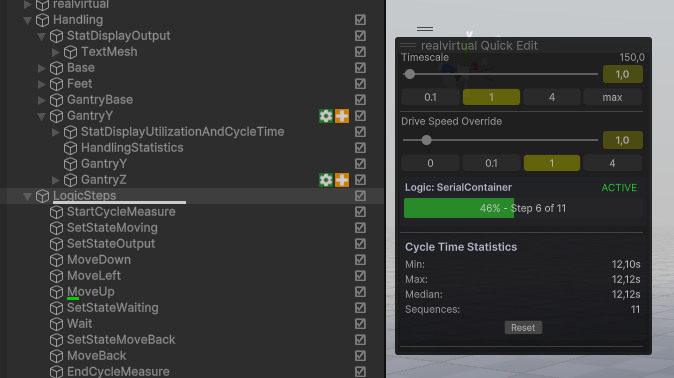
LogicSteps provide a visual, component-based system for creating automation sequences without PLCs or programming. You can control drives, sensors, and signals through predefined logic components that execute in sequence.
LogicSteps system in action showing sequential execution flow and real-time status updates
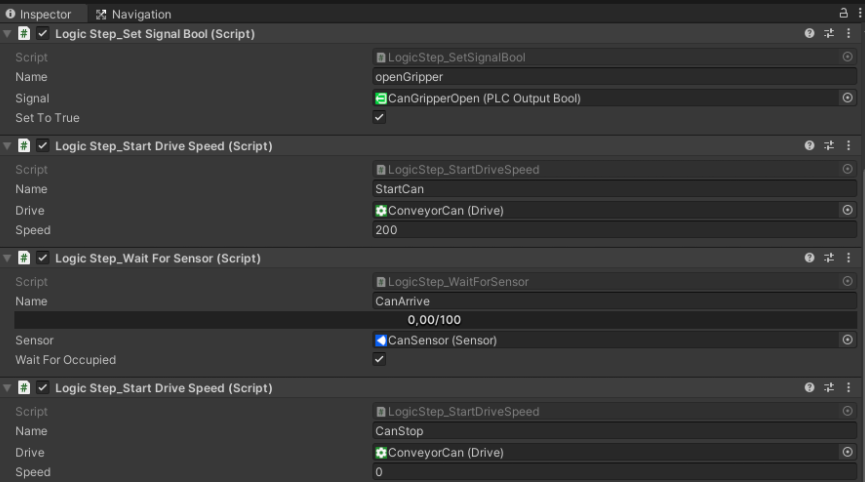
LogicSteps container configuration in Unity Inspector showing parallel and sequential execution options
Overview
Section titled “Overview”LogicSteps enable automation engineers to create complex production sequences using Unity’s Inspector interface. Each step is a component attached to a GameObject, and the component order determines execution sequence. The system supports both sequential and parallel execution patterns through container components.
LogicSteps automatically handle execution flow, progress visualization, and state management. Blocking steps pause execution until completion, while non-blocking steps execute immediately.
Properties
Section titled “Properties”Base LogicStep Properties
Section titled “Base LogicStep Properties”All LogicStep components inherit these common properties:
Unique identifier for the logic step.
- Type: String
- Default: Empty
- Use case: Required for jump operations and sequence debugging
Progress indicator for blocking operations.
- Type: Float (0-100)
- Default: 0
- Use case: Visual feedback for step completion progress (hidden for non-blocking steps)
Step Active
Section titled “Step Active”Indicates if this step is currently executing.
- Type: Boolean (read-only)
- Use case: Runtime debugging and monitoring
Container Components
Section titled “Container Components”Serial Container
Section titled “Serial Container”Executes child LogicSteps in sequential order.
Debug Mode
Section titled “Debug Mode”Enables detailed execution logging.
- Type: Boolean
- Default: false
- Use case: Troubleshooting sequence execution
Active Logic Step
Section titled “Active Logic Step”Index of currently executing step.
- Type: Integer (read-only)
- Use case: Monitor current execution position
Number Logic Steps
Section titled “Number Logic Steps”Total number of child steps.
- Type: Integer (read-only)
- Use case: Sequence overview and validation
Parallel Container
Section titled “Parallel Container”Executes child LogicSteps simultaneously.
Debug Mode
Section titled “Debug Mode”Enables detailed execution logging.
- Type: Boolean
- Default: false
- Use case: Troubleshooting parallel execution
Available LogicStep Types
Section titled “Available LogicStep Types”Pauses execution for a specified duration.
Duration
Section titled “Duration”Time to wait in seconds.
- Type: Float
- Default: 1.0
- Range: 0.1 to 3600.0
- Use case: Timing delays in production sequences

Drive To
Section titled “Drive To”Moves a drive to a specific position and waits for completion.
Target drive component to control.
- Type: Drive reference
- Default: None
- Use case: Connect to the drive you want to position
Destination
Section titled “Destination”Target position in millimeters or degrees.
- Type: Float
- Default: 0
- Use case: Set absolute or relative target position
Destination From PLC Output
Section titled “Destination From PLC Output”Alternative position source from PLC interface.
- Type: PLCOutputFloat reference
- Default: None
- Use case: Dynamic positioning from external control systems
Relative
Section titled “Relative”Treats destination as offset from current position.
- Type: Boolean
- Default: false
- Use case: Incremental movements relative to current position
Live Edit
Section titled “Live Edit”Enables real-time parameter adjustment during runtime.
- Type: Boolean
- Default: false
- Use case: Runtime tuning and debugging

Start Drive To
Section titled “Start Drive To”Initiates drive movement without waiting for completion (non-blocking). Execution continues immediately to the next step while the drive moves in the background.
This is useful when you want to start multiple drives simultaneously or continue with other logic while a drive is moving. To wait for the drive to finish, follow with a Wait for Signal Bool step monitoring the drive’s AtPosition signal.
Target drive component to control.
- Type: Drive reference
- Default: None
Destination
Section titled “Destination”Target position in millimeters or degrees.
- Type: Float
- Default: 0
Direction
Section titled “Direction”Movement direction.
- Type: Enum (Automatic / Forward / Backward)
- Default: Automatic
Relative
Section titled “Relative”Treats destination as offset from current position.
- Type: Boolean
- Default: false
- Use case: Incremental movements relative to current position
Live Edit
Section titled “Live Edit”Enables real-time parameter adjustment during runtime.
- Type: Boolean
- Default: false
Usage pattern:
1. Start Drive To (position 500, non-blocking)2. Set Signal Bool (activate something while drive moves)3. Wait for Signal Bool (drive AtPosition = true)
Start Drive Speed
Section titled “Start Drive Speed”Sets drive speed for continuous movement.
Target drive component to control.
- Type: Drive reference
- Default: None
- Use case: Connect to the drive you want to control
Movement speed in mm/s or deg/s.
- Type: Float
- Default: 100
- Range: -1000 to 1000
- Use case: Positive for forward, negative for backward, zero to stop

Wait for Drives at Target
Section titled “Wait for Drives at Target”Pauses execution until specified drives reach their target positions.
Drives
Section titled “Drives”List of drives to monitor.
- Type: Drive array
- Default: Empty
- Use case: Synchronize multiple drive movements

Wait for Sensor
Section titled “Wait for Sensor”Pauses execution until sensor reaches specified state.
Sensor
Section titled “Sensor”Target sensor component to monitor.
- Type: Sensor reference
- Default: None
- Use case: Connect to proximity, vision, or other sensor types
Wait for Occupied
Section titled “Wait for Occupied”Determines which sensor state triggers continuation.
- Type: Boolean
- Default: true
- Use case: true waits for occupied, false waits for not occupied

Wait for Signal Bool
Section titled “Wait for Signal Bool”Pauses execution until boolean signal reaches specified state.
Signal
Section titled “Signal”Target signal to monitor.
- Type: Signal reference
- Default: None
- Use case: Connect to PLC or internal boolean signals
Wait for True
Section titled “Wait for True”Determines which signal state triggers continuation.
- Type: Boolean
- Default: true
- Use case: true waits for signal true, false waits for signal false
Set Signal Bool
Section titled “Set Signal Bool”Sets a boolean signal to true or false.
Signal
Section titled “Signal”Target signal to modify.
- Type: Signal reference
- Default: None
- Use case: Control PLC outputs or internal flags
Set to True
Section titled “Set to True”Value to assign to the signal.
- Type: Boolean
- Default: true
- Use case: true sets signal high, false sets signal low

Wait for Signal Float
Section titled “Wait for Signal Float”Pauses execution until a float signal meets a specified condition. Supports five comparison operators with configurable tolerance for equality checks. Useful for waiting on analog values like temperatures, pressures, or position feedback.
Signal
Section titled “Signal”Target float signal to monitor.
- Type: Signal reference
- Default: None
- Use case: Connect to any float-type signal (PLCOutputFloat, PLCInputFloat, etc.)
Comparison
Section titled “Comparison”Comparison operator for evaluating the signal value against the target.
- Type: ComparisonType (dropdown)
- Default: GreaterOrEqual
- Options: GreaterThan (>), LessThan (<), Equals (==), GreaterOrEqual (>=), LessOrEqual (<=)
- Use case: Select the condition that must be met before proceeding
Target value to compare the signal against.
- Type: Float
- Default: 0
- Use case: Set the threshold or target value in signal units
Tolerance
Section titled “Tolerance”Tolerance for equality comparison to handle floating-point precision.
- Type: Float
- Default: 0.01
- Minimum: 0.0001
- Use case: Only applies when Comparison is set to Equals. A tolerance of 0.01 means values within ±0.01 of the target are considered equal
Set Signal Float
Section titled “Set Signal Float”Sets a float signal to a specified value and immediately proceeds to the next step. This non-blocking step is commonly used for setting speed values, position targets, or analog control outputs.
Signal
Section titled “Signal”Target float signal to modify.
- Type: Signal reference
- Default: None
- Use case: Connect to any float-type signal (PLCInputFloat, PLCOutputFloat, etc.)
Float value to assign to the signal.
- Type: Float
- Default: 0
- Use case: Set the desired value in signal units (e.g., speed in mm/s, temperature in °C)
Jump on Signal
Section titled “Jump on Signal”Conditionally jumps to a named step based on signal state.
Jump to Step
Section titled “Jump to Step”Name of the target LogicStep to jump to.
- Type: String
- Default: Empty
- Use case: Must match the Name property of target step exactly
Signal
Section titled “Signal”Signal to evaluate for jump condition.
- Type: Signal reference
- Default: None
- Use case: Connect to boolean signal for conditional logic
Jump On
Section titled “Jump On”Signal state that triggers the jump.
- Type: Boolean
- Default: true
- Use case: true jumps when signal is high, false jumps when signal is low

Enable
Section titled “Enable”Controls GameObject active state.
GameObject
Section titled “GameObject”Target GameObject to enable or disable.
- Type: GameObject reference
- Default: None
- Use case: Show/hide objects or enable/disable components
Enable
Section titled “Enable”Desired active state for the GameObject.
- Type: Boolean
- Default: true
- Use case: true activates GameObject, false deactivates it
Cinemachine Camera
Section titled “Cinemachine Camera”Controls virtual camera activation for scene visualization.
Virtual Camera
Section titled “Virtual Camera”Target Cinemachine virtual camera.
- Type: CinemachineVirtualCamera reference
- Default: None
- Use case: Switch camera views during automation sequences
Grip Pick
Section titled “Grip Pick”Triggers a Grip component to pick MUs.
Target Grip component.
- Type: Grip reference
- Default: None
Blocking
Section titled “Blocking”If true, waits up to 10 seconds for the MU to be successfully gripped before proceeding.
- Type: Boolean
- Default: false
- Use case: Enable when subsequent steps depend on the MU being picked. Leave disabled when you just want to trigger the pick and continue.
Grip Place
Section titled “Grip Place”Triggers a Grip component to place (release) all currently held MUs.
Target Grip component.
- Type: Grip reference
- Default: None
Blocking
Section titled “Blocking”If true, waits up to 10 seconds for all MUs to be successfully placed before proceeding.
- Type: Boolean
- Default: false
- Use case: Enable when subsequent steps depend on the MU being placed at its target.
Set Active Only
Section titled “Set Active Only”Sets the ActiveOnly property on one or more realvirtualBehavior components. This non-blocking step allows you to enable or disable specific behaviors during a sequence without affecting other components.
Behaviors
Section titled “Behaviors”List of realvirtualBehavior components to modify.
- Type: List of realvirtualBehavior references
- Default: Empty
Set To Always
Section titled “Set To Always”If true, sets ActiveOnly to Always (active). If false, sets it to Never (inactive).
- Type: Boolean
- Default: true
- Use case: Temporarily disable drives or behaviors during a sequence phase
Statistics LogicSteps
Section titled “Statistics LogicSteps”Stat Start Cycle
Section titled “Stat Start Cycle”Marks the beginning of a production cycle for statistics.
Stat End Cycle
Section titled “Stat End Cycle”Marks the end of a production cycle for statistics.
Stat State
Section titled “Stat State”Records state information for performance analysis.
Stat Output
Section titled “Stat Output”Generates statistical output data.
Usage Examples
Section titled “Usage Examples”Basic Sequence Setup
Section titled “Basic Sequence Setup”- Create an empty GameObject for your sequence
- Add LogicStep components in desired execution order
- Configure each step’s properties in the Inspector
- Use Name property for steps referenced by jumps
- Run the scene to execute the sequence
Sequential Process Example
Section titled “Sequential Process Example”1. Start Drive Speed (move conveyor forward)2. Wait for Sensor (part detected)3. Delay (settling time)4. Drive To (position actuator)5. Set Signal Bool (activate gripper)6. Set Signal Float (set pressure to 5.0 bar)7. Wait for Signal Float (wait until pressure >= 4.5 bar)8. Drive To (return actuator)9. Start Drive Speed (continue conveyor)Parallel Execution
Section titled “Parallel Execution”- Add Parallel Container component
- Add child LogicSteps that should execute simultaneously
- Each child step runs independently
- Container completes when all children finish
Conditional Logic
Section titled “Conditional Logic”- Use Jump on Signal for branching logic
- Set up signal monitoring for decision points
- Create named target steps for jump destinations
- Implement error handling with conditional jumps
Editor Tools
Section titled “Editor Tools”Adding LogicSteps
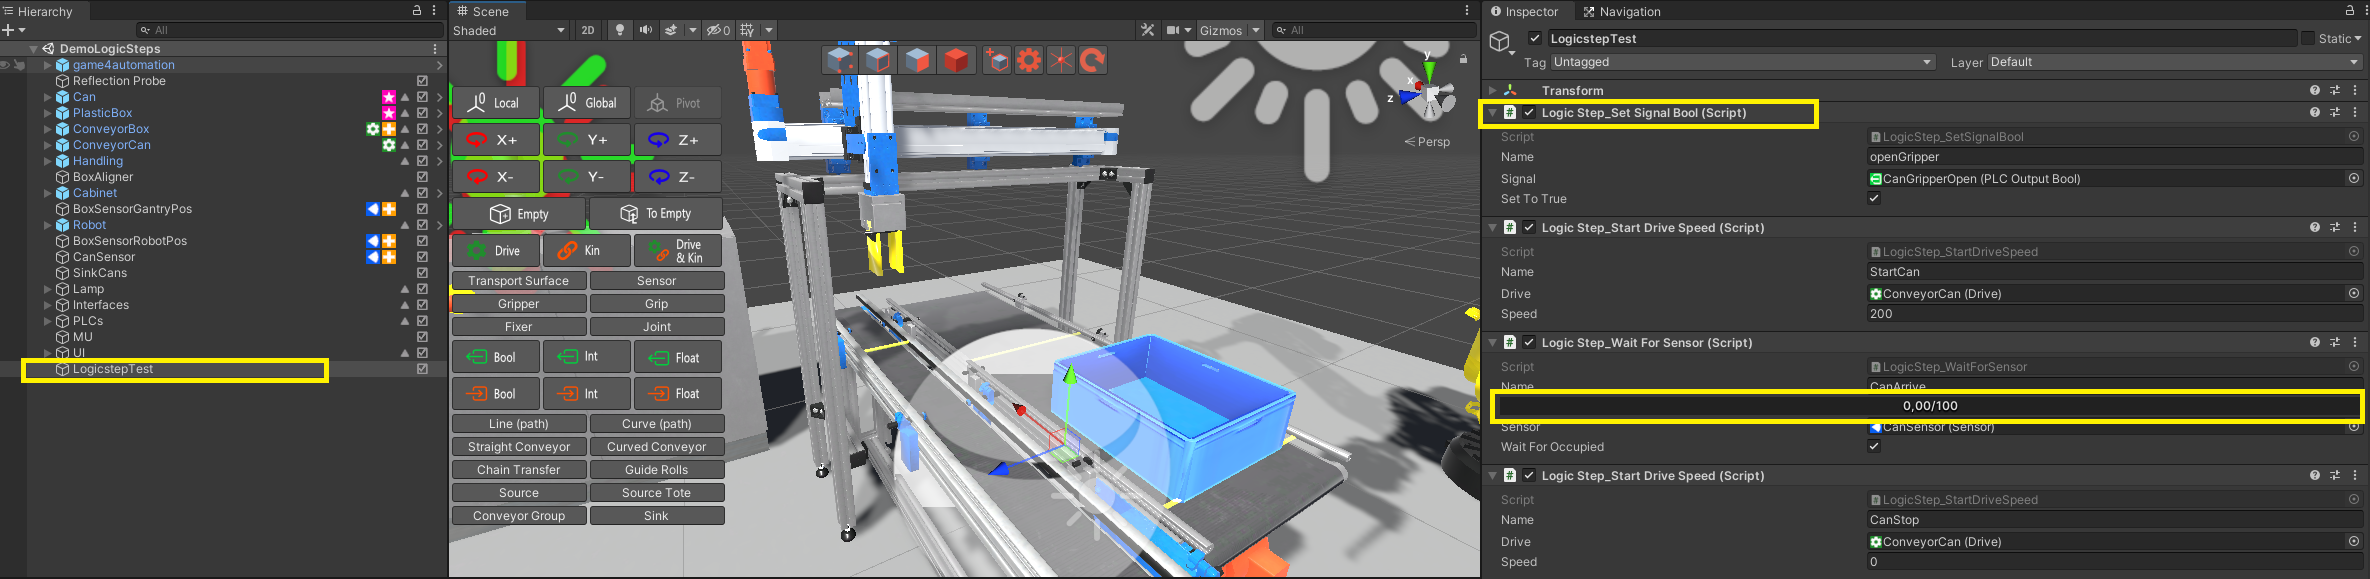
Section titled “Adding LogicSteps”- Scene Menu: Right-click when LogicStep component is attached
- Component Menu: Component > realvirtual > Add Component > LogicStep
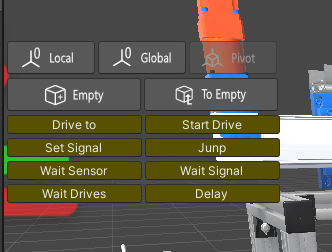
- Quick Access: Overlay menu appears with all available steps
Sequence Management
Section titled “Sequence Management”- Drag and Drop: Reorder components to change execution sequence
- Progress Bars: Visual feedback for blocking operations
- Live Edit: Runtime parameter adjustment for debugging
- Debug Mode: Detailed logging for troubleshooting
Custom LogicStep Development
Section titled “Custom LogicStep Development”Creating Custom Steps
Section titled “Creating Custom Steps”- Create new script in LogicSteps folder
- Inherit from
LogicStepbase class - Implement required methods:
NonBlocking(): Return true for non-blocking stepsOnStarted(): Execute step logic
- Call
NextStep()when step completes
Example Implementation
Section titled “Example Implementation”public class LogicStep_StartDriveSpeed : LogicStep{ public Drive drive; public float Speed;
protected new bool NonBlocking() { return true; }
protected override void OnStarted() { if (drive != null) { drive.TargetSpeed = Mathf.Abs(Speed); if (Speed > 0) { drive.JogForward = true; drive.JogBackward = false; } else if (Speed == 0) { drive.JogForward = false; drive.JogBackward = false; } else if (Speed < 0) { drive.JogForward = false; drive.JogBackward = true; } } NextStep(); }}Base Class Methods
Section titled “Base Class Methods”protected void NextStep(): Advance to next step in sequenceprotected void NextStep(string stepName): Jump to named steppublic void StartStep(): Initialize step executionprotected void Start(): Begin sequence at runtime
Required Implementations
Section titled “Required Implementations”protected new bool NonBlocking(): Define step execution typeprotected override void OnStarted(): Implement step behavior
💡 Hint
Always callNextStep()when your custom step completes to ensure proper sequence flow.
See Also
Section titled “See Also”- Drive - Motor control for LogicStep drive operations
- Sensor - Sensor components for wait conditions
- Unity Visual Scripting - Alternative visual programming approach
- Behavior Graph - Advanced logic definition system
© 2025 realvirtual GmbH https://realvirtual.io - All rights reserved. No part of this publication may be reproduced, distributed, or transmitted in any form or by any means, including printing, saving, photocopying, recording, or other electronic or mechanical methods, without the prior written permission of the publisher.