
Selection Window (Pro)
The Selection Window is enabling a fast selection of components in the 3D assembly (game object) hierarchy. You can select components based on the visibility status, assign groups to components and view and hide groups.
Opening the selection window
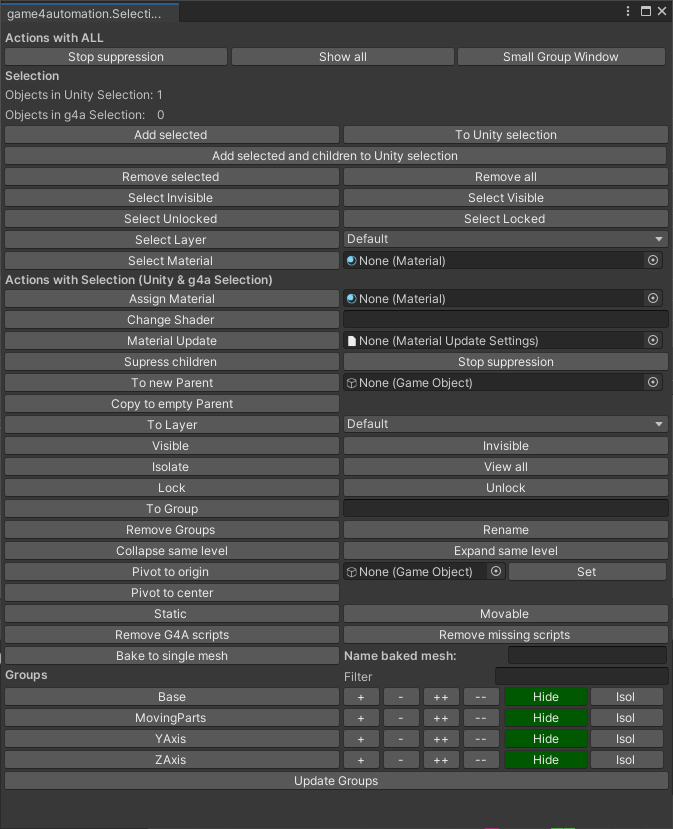
Section titled “Opening the selection window”To open the Selection window please select realvirtual> Selection window (Pro) in the realvirtual.io menu. This will open this window:
Actions with ALL
Section titled “Actions with ALL”In the section Actions with ALL you can sop the suppression of all components or show all hidden components.
Selection
Section titled “Selection”It is important to know that there are two levels of selection. The first one is the normal Unity Selection (this means all highlighted objects in the hierarchy). You can save currently selected objects in a temporarily g4a selection by pushing Add selected. All actions that you are performing under Actions with Selection are performed on the Unity AND rvselection.
| Button | Description |
|---|---|
Add selected | Adds the selected components to the rvselection |
To Unity selection | Moves the rvselection to the Unity selection |
Remove selected | Removes the selected objects from the rvselection |
Remove all | Removes all objects from the rvselection |
Select Invisible | Selects all invisible objects |
Select Visible | Selects all visible objects |
Select Unlocked | Selects all unlocked objects |
Select Locked | Selects all locked objects |
Select Layer | Selects all objects on the defined layer |
Select Material | Selects all objects with the defined material |
Actions with selection
Section titled “Actions with selection”These are actions that you can perform with the selected objects. The actions are always performed for all objects in the current Unity and realvirtual.io selection.
| Button | Action |
|---|---|
Assign Material | Assigns the selected material |
| Change Shader | Changes the shader of the material |
| Material Update | With a material update, defined materials in a scene can be replaced with others. Material Update |
Suppress children | Suppresses all children components in the hierarchy view |
To new Parent | Moves the components to the new (selected) parent |
Copy to empty Parent | Makes a copy of the components and moves them to the new (selected) parent |
To Layer | Moves the components to the defined layer |
Visible | Makes the selected components visible |
Invisible | Makes the selected components invisible |
Isolate | Isolates the selected components (and makes the rest invisible) |
View all | Stops the isolation and displays all components |
Lock | Locks the components |
Unlocked | Unlocks the components |
To Group | Assigns the components to the defined group. If the group is not yet existing it is created. |
Remove Groups | Removes all groups from the selected components |
Collapse same level | Collapses all components to the same hierarchy level |
Expand same levels | Expands all components to the same hierarchy level |
Pivot to origin | Moves the pivot of the component to the origin of the defined component |
Pivot to center | Moves the pivot of the component to the center of the defined component |
Static | Makes the components static |
Movable | Makes the components non-static (movable) |
Remove G4A scripts | Removes all realvirtual.io Scripts from the selected components |
| Remove missing scripts | Removes all null-components from the current selection |
| Bake to single mesh | Combines all selected meshes to one mesh and saves it to a new gameObject. You can define a name for this gameObject in “Name baked mesh:“ |
Groups
Section titled “Groups”In the Group section, you can find all groups that are defined in the current model.
| Button | Action |
|---|---|
| Plus | Adds the selected components to the Group |
| Minus | Removes the selected components from the Group |
| Hide | Hides all components which are currently belonging to the Group |
| Show | Shows all components currently belonging to the Group |
Material Update
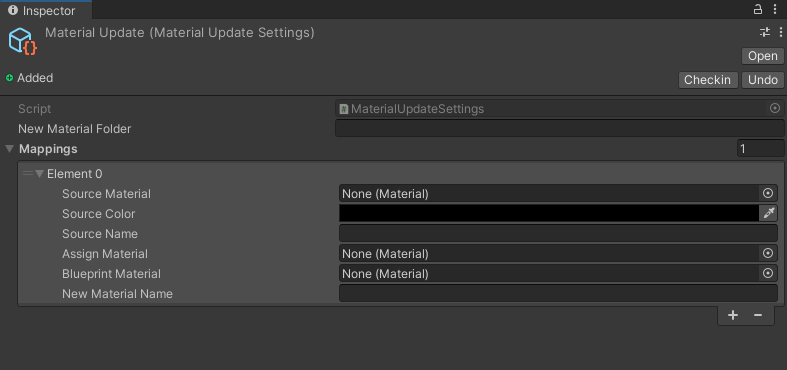
Section titled “Material Update”The Material update allows you to replace defined materials in a scene with others by one click. To use this feature, you need to define an update by creating an asset called “MaterialUpdate” in the current folder, which can be defined in the Inspector. To create the asset, right-click in the Project area and select “Create/realvirtual/Add material update settings”.
material update
You can use the following parameters to specify which materials should be replaced:
material, RGB color, and material name or partial name.
All of these input parameters are considered in the order listed.
You can assign a specific material or a blueprint material, but only one of these options can be defined at a time.
Multiple mappings can be defined, and to add another mapping, simply click on the ”+” button. The mappings in the list are carried out sequentially, and they can overwrite each other.
The material update replaces materials of imported, non-instantiated prefabs with instantiated ones, resulting in improved performance.
,
© 2025 realvirtual GmbH https://realvirtual.io - All rights reserved. No part of this publication may be reproduced, distributed, or transmitted in any form or by any means, including printing, saving, photocopying, recording, or other electronic or mechanical methods, without the prior written permission of the publisher.