
Pre-Play Validation
The Pre-Play Validation system automatically detects and resolves common configuration issues before simulation startup, reducing debugging time and ensuring reliable automation system behavior.
Overview
Section titled “Overview”Pre-Play Validation proactively identifies potential problems in your scene configuration and either automatically fixes them or provides clear guidance for resolution. This validation system catches issues early in the development process, preventing runtime failures and unexpected behavior during virtual commissioning.
Key benefits include:
- Automated Problem Detection: Identifies configuration conflicts before they cause runtime issues
- Intelligent Auto-Fixes: Automatically resolves common problems like conflicting component settings
- Clear Diagnostic Messages: Provides specific, actionable feedback for manual fixes
- Development Workflow Integration: Runs seamlessly during normal development activities
- Reduced Debugging Time: Catches issues before they become complex runtime problems
💡 Hint Enable validation early in your project development to establish good configuration practices and catch issues as they develop rather than during final testing.
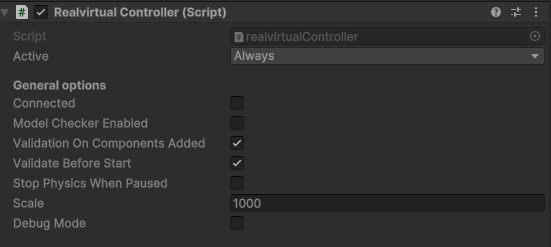
Enable Pre-Play Validation in RealvirtualController settings
Quick Start
Section titled “Quick Start”Enable Validation (1 minute)
Section titled “Enable Validation (1 minute)”- Locate RealvirtualController in your scene (usually on a “Controller” GameObject)
- Check Validation Settings in the Inspector:
- Validate Before Start: ✅ Enable for pre-simulation checks
- Validation On Components Added: ✅ Enable for real-time component validation
- Test the System: Start Play mode and check Unity Console for validation messages
Understanding Validation Output
Section titled “Understanding Validation Output”Validation messages appear in Unity Console with this format:
[Validation] RuleName: Description of issue and action takenContext: GameObject "ObjectName" → Component typeConfiguration Options
Section titled “Configuration Options”RealvirtualController Settings
Section titled “RealvirtualController Settings”Validate Before Start Runs comprehensive scene validation when entering Play mode.
- Type: Boolean
- Default: true
- Use case: Catch configuration issues before simulation starts
- Performance: Minimal impact on startup time
Validation On Components Added Validates components immediately when added in Editor mode.
- Type: Boolean
- Default: true
- Use case: Prevent invalid configurations during scene building
- Performance: Real-time validation with no runtime impact
Development Workflow Integration
Section titled “Development Workflow Integration”Recommended Settings for Different Phases:
Early Development: Both validations enabled
- Helps establish proper configuration patterns
- Catches issues as components are added
Production/Testing: Pre-play validation enabled, component validation optional
- Ensures scene integrity before critical testing
- Reduces validation interruptions during rapid development
Final Release: Validation can be disabled for performance
- Remove validation overhead in final builds
- All configuration issues should be resolved by this stage
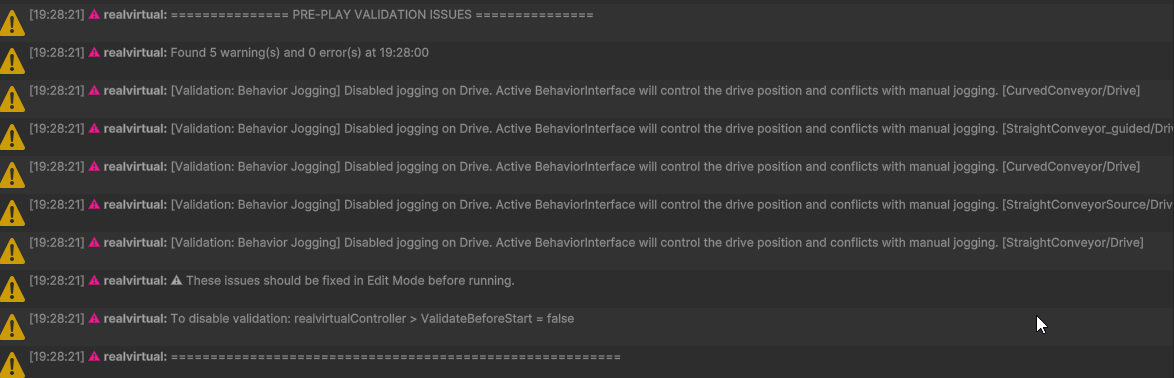
Validation warnings displayed in Unity Console
Validation Rules Reference
Section titled “Validation Rules Reference”The validation system includes specialized rules that target common configuration problems in industrial automation setups.
Control System Validation
Section titled “Control System Validation”BehaviorInterface Jogging Conflict Resolution
Section titled “BehaviorInterface Jogging Conflict Resolution”Problem Detected: Drive components with both BehaviorInterface control and manual jogging enabled
Why This Matters:
- BehaviorInterface components provide programmatic drive control for automation sequences
- Manual jogging controls (JogForward/JogBackward) are intended for manual testing and debugging
- Having both active creates conflicting control signals and unpredictable behavior
Automatic Resolution:
- Disables
JogForwardandJogBackwardproperties on affected Drive components - Preserves BehaviorInterface control for proper automation operation
- Maintains drive functionality while eliminating control conflicts
Example Scenario:
Conveyor System with BehaviorInterfaceConveyor component:✅ Before: Drive has jogging enabled + active BehaviorInterface❌ Problem: Conflicting control signals cause erratic movement✅ After: Jogging disabled, BehaviorInterface maintains full controlConsole Message:
[Validation] BehaviorInterfaceJoggingRule: Disabled jogging on Drive.Active BehaviorInterface will control drive position and conflicts with manual jogging.Context: GameObject "ConveyorDrive" → Drive componentMultiple BehaviorInterface Prevention
Section titled “Multiple BehaviorInterface Prevention”Problem Detected: GameObjects with multiple active BehaviorInterface components
Why This Matters:
- Each GameObject should have only one active control interface
- Multiple interfaces create ambiguous control authority
- Can cause timing conflicts and synchronization issues
Automatic Resolution:
- Keeps the first active BehaviorInterface component
- Disables additional BehaviorInterface components
- Preserves the primary control interface functionality
Example Scenario:
Robot Arm with multiple control interfaces:✅ Before: BehaviorInterfaceRobot + BehaviorInterfaceSequence both active❌ Problem: Conflicting position commands from two controllers✅ After: Primary interface remains active, secondary disabledMotion System Validation
Section titled “Motion System Validation”Single Drive Component Enforcement
Section titled “Single Drive Component Enforcement”Problem Detected: Multiple Drive components on the same GameObject
Why This Matters:
- Unity GameObjects support only one primary motion controller
- Multiple Drive components create conflicting transform updates
- Can cause jittery movement, position fighting, or complete motion failure
Immediate Resolution:
- Removes duplicate Drive components as soon as they’re added
- Preserves the original Drive component configuration
- Triggers immediately during component addition (not just pre-play)
Prevention Strategy:
Hierarchy Design:✅ Correct: One Drive per GameObject  ├── ConveyorSystem (Drive component)  ├── RobotArm (Drive component)  └── ElevatorPlatform (Drive component)
❌ Incorrect: Multiple Drives on same GameObject  ├── ComplexMachine (Drive + Drive) ← Second Drive removed
Transport Surface Hierarchy Validation
Section titled “Transport Surface Hierarchy Validation”Problem Detected: Improper Drive-TransportSurface hierarchy configurations
Critical Physics Requirements:
- TransportSurface components need Drive control for proper operation
- Unity physics constraints prevent certain Drive-TransportSurface arrangements
- Missing Drive references cause non-functional conveyor systems
Validation Logic:
✅ Valid Configurations:
- TransportSurface with explicit DriveReference assigned
- TransportSurface with exactly one Drive in parent hierarchy
- TransportSurface as child of Drive GameObject
❌ Invalid Configurations:
- TransportSurface without Drive and no DriveReference
- TransportSurface with multiple Drives above it in hierarchy
- Drive component positioned above TransportSurface violating physics
Practical Examples:
✅ Correct Hierarchy 1: Direct ReferenceConveyor├── Belt (TransportSurface + DriveReference to Drive)└── Motor (Drive component)
✅ Correct Hierarchy 2: Parent-Child RelationshipConveyorSystem (Drive component)└── Belt (TransportSurface component)
❌ Problematic Hierarchy: Missing Drive ControlConveyor└── Belt (TransportSurface only) ← No drive control
❌ Physics Violation: Drive Above TransportSurfaceFactoryFloor (Drive component)└── ConveyorSection (TransportSurface) ← Physics conflict
Console Messages:
[Validation] TransportSurfaceDriveHierarchyRule: TransportSurface requires a Drive componentin the hierarchy to function properly. Please add a Drive component or assign DriveReference.Context: GameObject "ConveyorBelt" → TransportSurface componentValidation Triggers
Section titled “Validation Triggers”Pre-Play Validation
Section titled “Pre-Play Validation”Automatically runs when entering Play mode (if enabled):
- BehaviorInterface Jogging Conflicts: Drive components with conflicting control methods
- Multiple BehaviorInterface Detection: GameObjects with multiple active interfaces
- TransportSurface Hierarchy: Drive-TransportSurface relationship validation
Component Addition Validation
Section titled “Component Addition Validation”Runs immediately when components are added in Editor:
- Multiple Drive Prevention: Blocks duplicate Drive components on same GameObject
Practical Usage Examples
Section titled “Practical Usage Examples”Common Development Scenarios
Section titled “Common Development Scenarios”Scenario 1: Building a Conveyor System
Section titled “Scenario 1: Building a Conveyor System”Step-by-step with Validation Feedback:
-
Create Conveyor GameObject:
Hierarchy: ConveyorSystem -
Add Drive Component:
✓ Drive added successfully -
Add Second Drive (Mistake):
⚠ [Validation] PreventMultipleDrivesRule: Only one Drive component allowed per GameObject.Removing duplicate Drive component.✓ System prevents configuration error -
Add TransportSurface:
ConveyorSystem (Drive)└── Belt (TransportSurface)✓ Hierarchy validated - proper Drive-TransportSurface relationship
Scenario 2: Robot Arm with Automation Control
Section titled “Scenario 2: Robot Arm with Automation Control”Development Progression:
-
Initial Setup:
RobotArm (Drive + manual jogging enabled)✓ Manual testing configuration -
Add Automation Control:
RobotArm (Drive + BehaviorInterfaceRobot + jogging enabled)⚠ [Validation] BehaviorInterfaceJoggingRule: Disabled jogging on Drive.Active BehaviorInterface will control drive position.✓ System resolves control conflict automatically -
Final Configuration:
RobotArm (Drive + BehaviorInterfaceRobot)✓ Ready for automated operation
Manual Validation Control
Section titled “Manual Validation Control”Runtime Control
Section titled “Runtime Control”// Dynamic validation control during developmentpublic class ValidationController : MonoBehaviour{ public RealvirtualController realvirtualController;
public void EnableValidation() { realvirtualController.ValidateBeforeStart = true; Debug.Log("Validation enabled for next Play mode start"); }
public void DisableValidationTemporarily() { realvirtualController.ValidateBeforeStart = false; Debug.Log("Validation temporarily disabled"); }
public void RunManualValidation() { if (realvirtualController != null) { realvirtualController.RunValidation(); } }}Editor Integration
Section titled “Editor Integration”// Custom editor integration for validation[CustomEditor(typeof(RealvirtualController))]public class RealvirtualControllerEditor : Editor{ public override void OnInspectorGUI() { DrawDefaultInspector();
EditorGUILayout.Space(); EditorGUILayout.LabelField("Validation Tools", EditorStyles.boldLabel);
if (GUILayout.Button("Run Validation Now")) { ((RealvirtualController)target).RunValidation(); }
if (GUILayout.Button("Reset Validation Settings")) { ((RealvirtualController)target).ValidateBeforeStart = true; ((RealvirtualController)target).ValidationOnComponentsAdded = true; } }}Custom Validation Rules
Section titled “Custom Validation Rules”Extending the Validation System
Section titled “Extending the Validation System”The validation system supports custom rules for project-specific requirements:
// Custom validation rule examplepublic class CustomComponentValidationRule : PrePlayRule<CustomComponent>{    public override string RuleName => "CustomComponentValidationRule";
    protected override bool IsValid(CustomComponent component)    {        // Custom validation logic        return component.RequiredReference != null;    }
    protected override void FixComponent(CustomComponent component)    {        // Automatic fix if possible        if (component.RequiredReference == null)        {            component.RequiredReference = component.GetComponent<RequiredType>();        }    }
    protected override string GetWarningMessage(CustomComponent component)    {        return "CustomComponent requires a valid reference for proper operation.";    }}
Troubleshooting
Section titled “Troubleshooting”Validation Not Running
Section titled “Validation Not Running”Symptoms: No validation messages appear in Unity Console when starting Play mode or adding components
Diagnostic Steps:
-
Verify RealvirtualController Configuration:
// Check controller setupvar controller = FindObjectOfType<RealvirtualController>();if (controller == null){Debug.LogError("RealvirtualController not found in scene");}else{Debug.Log($"Validation enabled: {controller.ValidateBeforeStart}");} -
Check Console Filter Settings:
- Ensure Unity Console shows “Info” level messages
- Look for “[Validation]” prefix in console messages
- Check Console collapse setting doesn’t hide validation messages
-
Verify Component Targets:
- Validation only runs on components with active validation rules
- Test with known validation scenarios (add second Drive component)
Common Solutions:
- Enable “Validate Before Start” in RealvirtualController Inspector
- Ensure RealvirtualController GameObject is active in scene
- Check that validation target components exist in scene
Understanding Validation Messages
Section titled “Understanding Validation Messages”Message Format Analysis:
[Validation] RuleName: Action taken and reasonContext: GameObject "Name" → Component TypeExample Interpretation:
[Validation] BehaviorInterfaceJoggingRule: Disabled jogging on Drive.Active BehaviorInterface will control drive position and conflicts with manual jogging.Context: GameObject "ConveyorDrive" → Drive component
Translation:- Rule: BehaviorInterface jogging conflict detection- Action: Automatically disabled jogging properties- Reason: Prevent control conflicts- Location: ConveyorDrive GameObject's Drive component
Validation Conflicts and False Positives
Section titled “Validation Conflicts and False Positives”When Validation Seems Wrong:
-
Understand the Rule Logic:
- Review rule documentation to understand why it triggered
- Consider if your configuration follows realvirtual best practices
- Check if special use case requires different approach
-
Legitimate Special Cases:
// Temporary validation disable for special configurationspublic class SpecialCaseController : MonoBehaviour{void Start(){var controller = FindObjectOfType<RealvirtualController>();if (controller != null){// Disable for specific scenariocontroller.ValidateBeforeStart = false;Debug.Log("Validation disabled for special case scenario");}}} -
Configuration Review:
- Verify component hierarchy matches realvirtual patterns
- Check component references and dependencies
- Consider refactoring to standard configurations
Performance and Integration Issues
Section titled “Performance and Integration Issues”Editor Performance Impact:
Symptoms: Noticeable delays when adding components or starting Play mode
Optimization Approaches:
- Disable component addition validation during rapid prototyping
- Use pre-play validation only for final testing phases
- Consider scene complexity and number of validation targets
Multi-Scene Validation Issues:
Symptoms: Validation inconsistencies across different scenes
Solutions:
- Ensure each scene has its own RealvirtualController
- Validate scene-specific component configurations
- Use prefabs for consistent validation setups across scenes
See Also
Section titled “See Also”- RealvirtualController - Main controller component configuration
- Drive Component - Core motion component affected by validation
- BehaviorInterface - Automation control components
- TransportSurface - Conveyor system components
- Development Best Practices - Scene configuration guidelines
© 2025 realvirtual GmbH https://realvirtual.io - All rights reserved. No part of this publication may be reproduced, distributed, or transmitted in any form or by any means, including printing, saving, photocopying, recording, or other electronic or mechanical methods, without the prior written permission of the publisher.