
WebGL Publishing
WebGL builds allow you to run your Digital Twin directly in web browsers without any installation. This enables easy sharing and access through URLs, making it ideal for demonstrations and client presentations.
Prerequisites
Section titled “Prerequisites”WebGL build needs to be done with IL2CPP, and Windows DLLs which are used in some interfaces can’t be used (only way to communicate from a browser is Websocket).
Required Folder Deletions
Section titled “Required Folder Deletions”For building WebGL, you need to delete the following folders if they are in your project:
- CADLink
- SpaceNavigator
- All Interfaces (besides MQTT and TwinCATHMI - these both are the only ones which are possible with WebGL)
- parts4cad
- RobotIK
Build Configuration
Section titled “Build Configuration”1. Set WebGL Platform
Section titled “1. Set WebGL Platform”Set WebGL in Build Settings:
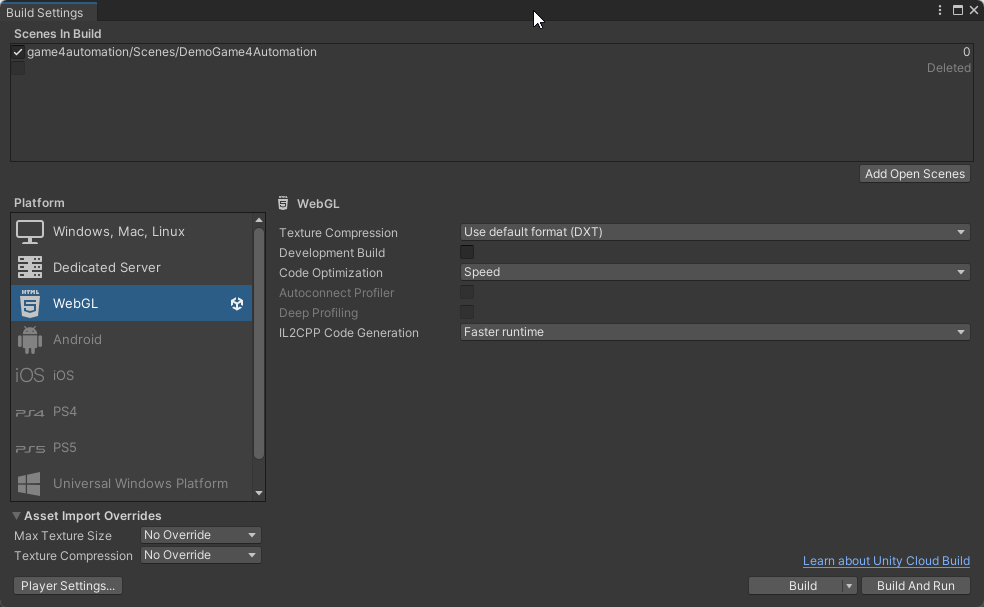
Setting WebGL in Build Settings
2. Scripting Define Symbols
Section titled “2. Scripting Define Symbols”Make sure that in Player Settings Scripting Define Symbols you have the same settings as for Windows (e.g., GAME4AUTOMATION and GAME4AUTOMATION_PROFESSIONAL).
3. Graphics API Configuration
Section titled “3. Graphics API Configuration”Disable Auto Graphics API in Player Settings to use exclusively WebGL2 (recommended):
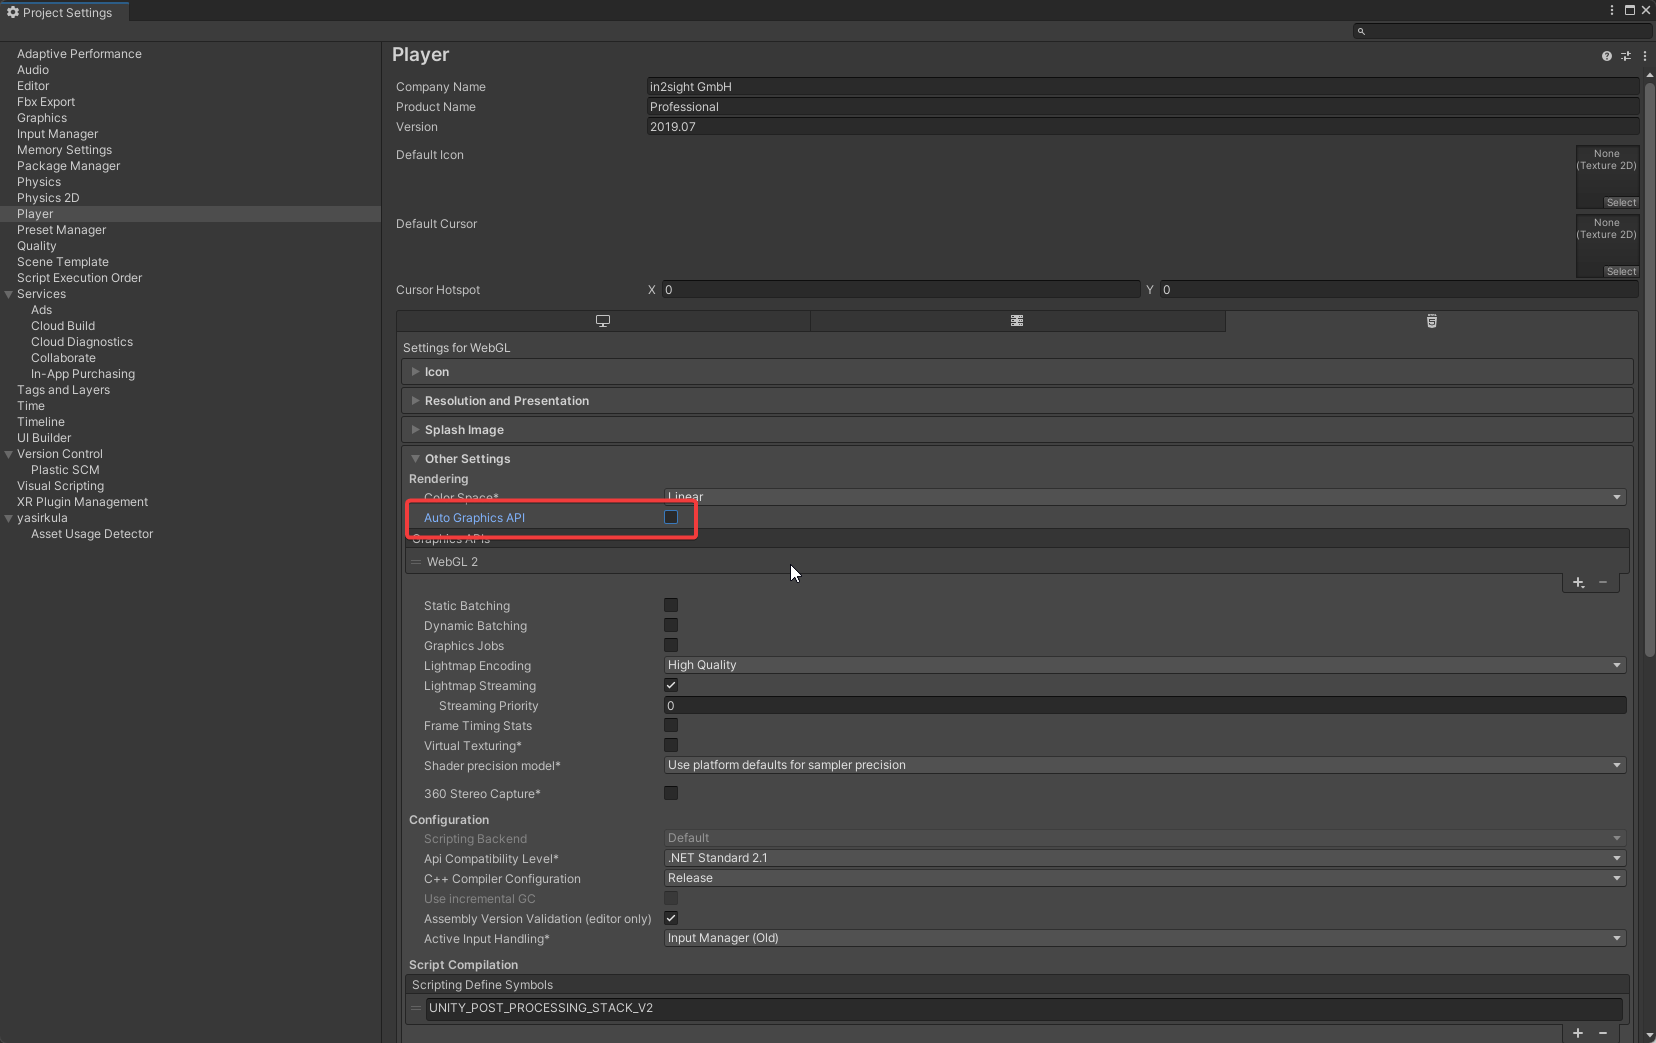
WebGL2 Graphics API configuration
4. Compression Settings
Section titled “4. Compression Settings”In Publishing Settings set Decompression Fallback - this prevents problems with some web servers.
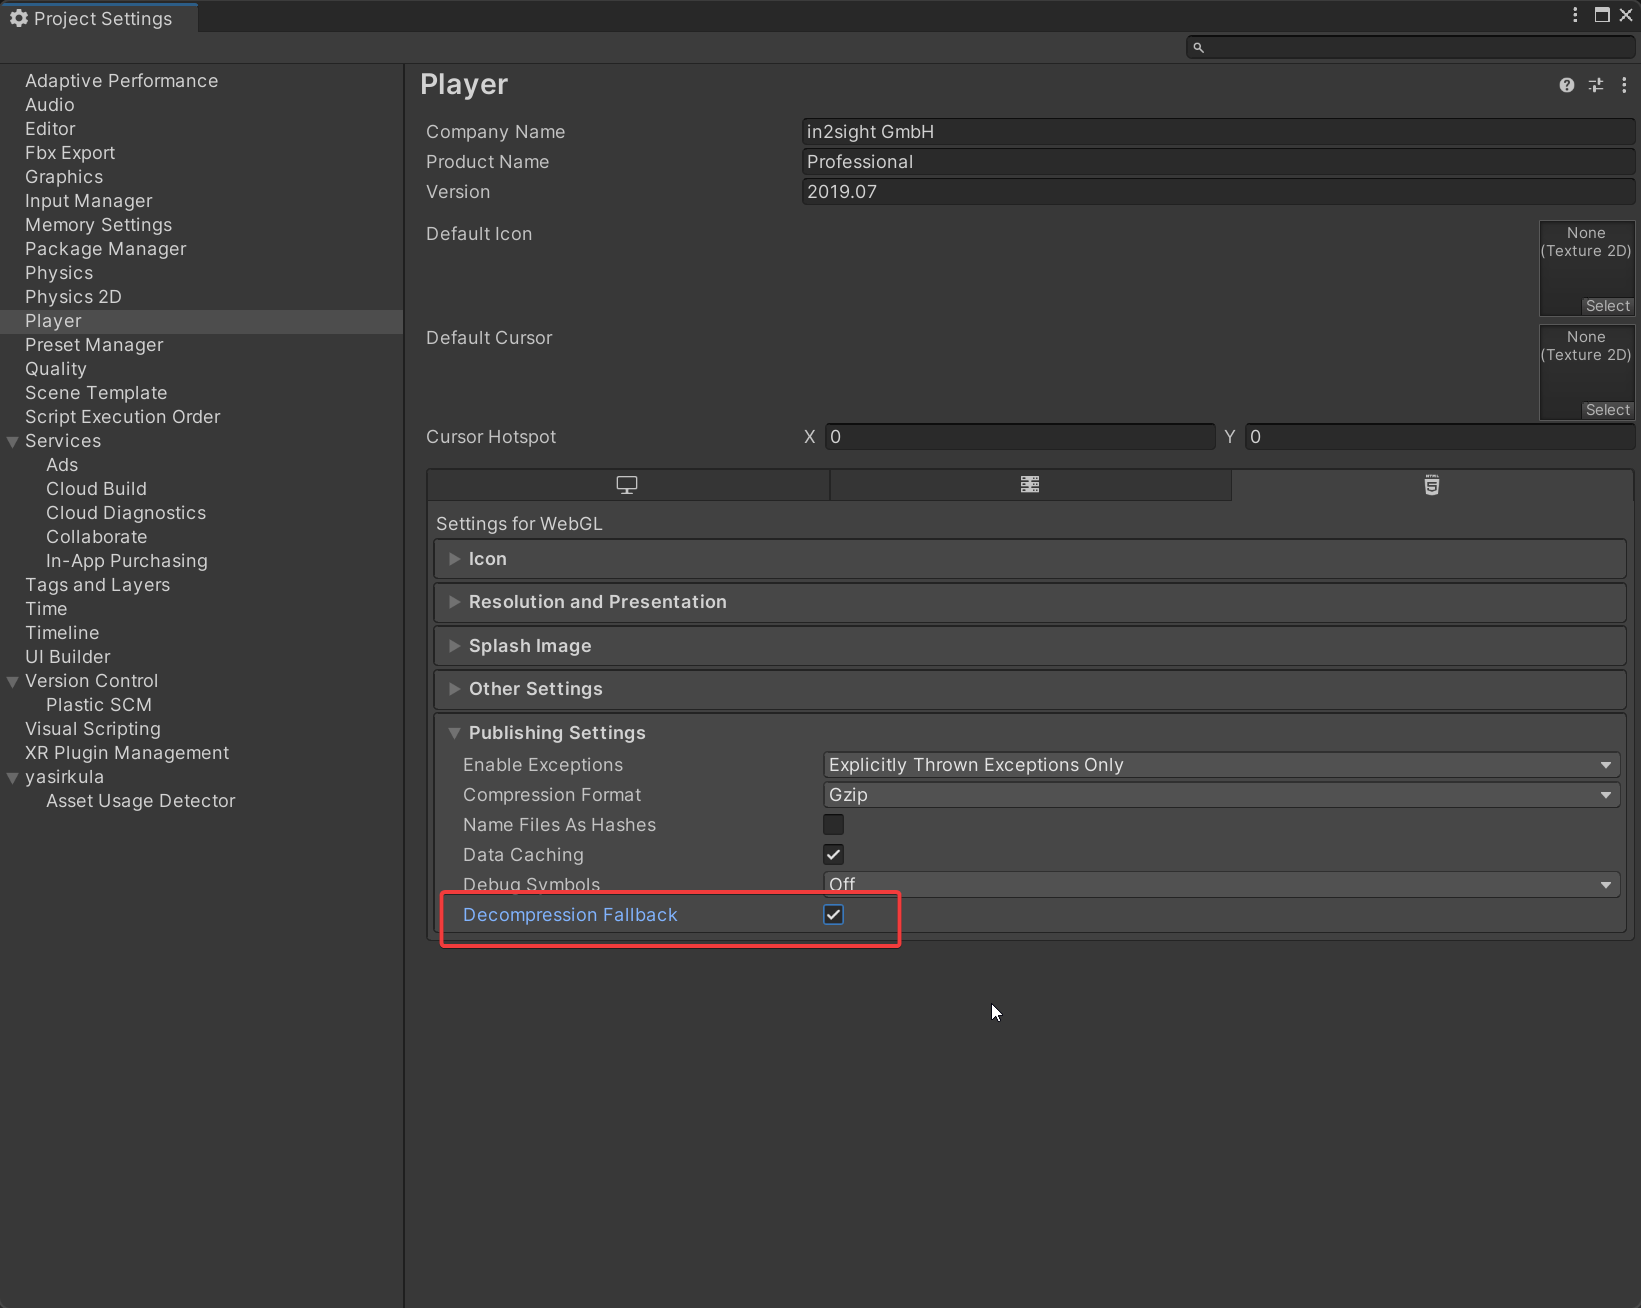
Decompression Fallback setting
Build Process
Section titled “Build Process”- Open File > Build Settings
- Select WebGL as the target platform
- Configure Player Settings as described above
- Click Build and choose your destination folder
- Wait for the build to complete (this may take 30-60 minutes)
- Unity will automatically start a local web server and open your browser
WebGL Template (realvirtual Professional)
Section titled “WebGL Template (realvirtual Professional)”Enhance your Unity WebGL projects with the realvirtual WebGL Template, offering a full-screen, responsive design for an improved user experience compared to the standard Unity WebGL Template.
Installation Steps
Section titled “Installation Steps”-
Locate Template Files: Find the template files in your Unity project at:
Terminal window Assets/realvirtual/Professional/WebGLTemplate/realvirtual -
Copy Template Files: Copy these files.
-
Paste into WebGLTemplates: Paste the copied files into:
Terminal window Assets/WebGLTemplates/realvirtual
Setting the Template
Section titled “Setting the Template”- Open Unity.
- Go to Edit > Project Settings.
- In Player settings, find Resolution and Presentation.
- Choose the realvirtual template from the “Template” dropdown menu.
- Save your changes.
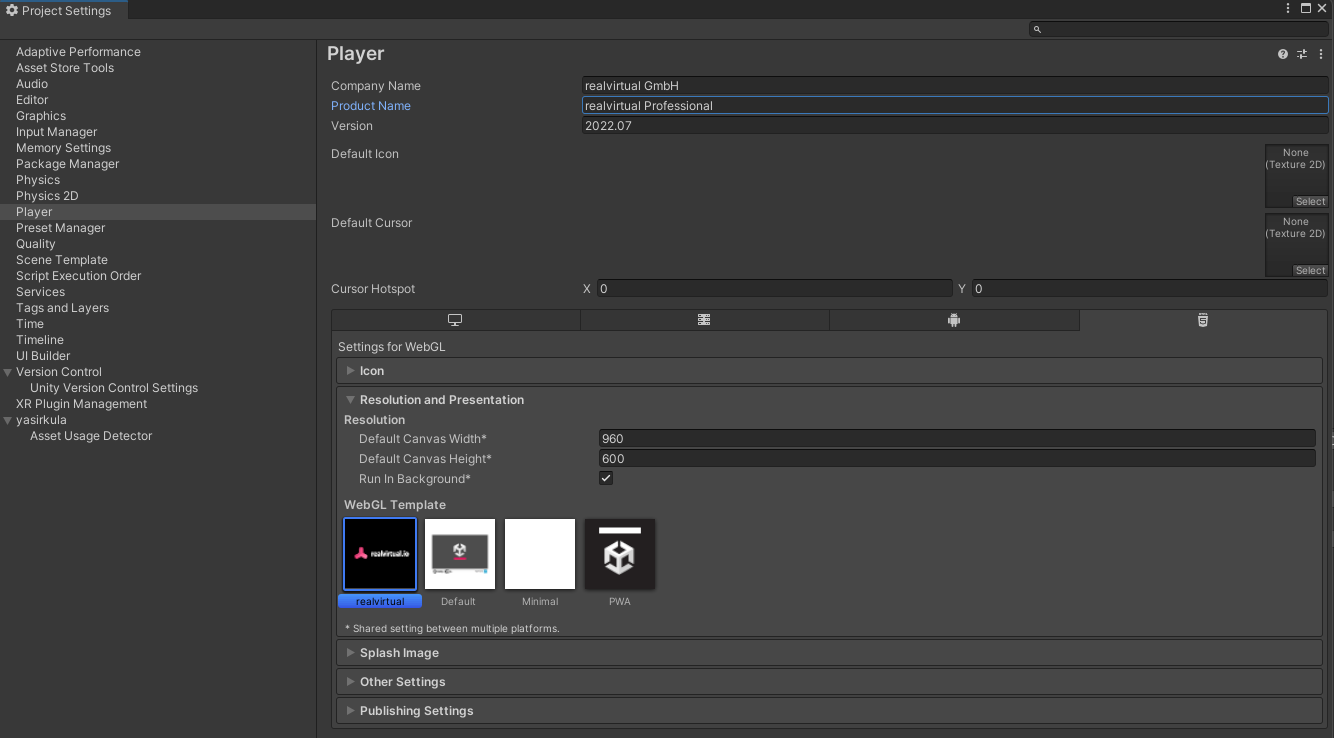
realvirtual WebGL Template selection
Deployment
Section titled “Deployment”Web Server Requirements
Section titled “Web Server Requirements”To deploy your WebGL build:
- Copy the entire build folder contents to your web server
- Ensure your web server supports:
- Proper MIME types for Unity files
- Compression (gzip or Brotli)
- HTTPS (recommended for full functionality)
Common Web Servers
Section titled “Common Web Servers”- Apache: Add .htaccess with proper MIME types
- nginx: Configure mime.types for Unity file extensions
- IIS: Add MIME types in web.config
- Cloud platforms: AWS S3, Azure Static Web Apps, GitHub Pages
Interface Support
Section titled “Interface Support”WebGL builds have limited interface support due to browser security restrictions:
Supported Interfaces:
- MQTT (Pro) - Websocket-based messaging
- TwinCAT HMI (Pro) - Websocket-based communication
Not Supported:
- OPC-UA
- S7 TCP/IP
- Modbus
- TwinCAT ADS
- Shared Memory
- Any Windows DLL-based interfaces
For full interface compatibility, use Windows builds.
Performance Considerations
Section titled “Performance Considerations”- Build Time: First builds can take 30-60 minutes
- File Size: WebGL builds are typically larger than native builds
- Runtime Performance: 60-70% of native performance is typical
- Memory: Browser memory limitations apply
- Mobile: Limited support on mobile browsers
Browser Compatibility
Section titled “Browser Compatibility”Recommended browsers:
- Chrome/Edge (Chromium-based) - Best performance
- Firefox - Good compatibility
- Safari - Basic support (may have limitations)
Troubleshooting
Section titled “Troubleshooting”Build Fails
Section titled “Build Fails”- Ensure all incompatible folders are deleted
- Check that IL2CPP is selected as scripting backend
- Verify WebGL module is installed in Unity Hub
Build Runs Locally But Not on Server
Section titled “Build Runs Locally But Not on Server”- Check web server MIME type configuration
- Verify compression settings match build settings
- Ensure HTTPS is enabled if using certain features
Performance Issues
Section titled “Performance Issues”- Reduce scene complexity
- Use texture compression
- Optimize draw calls
- Consider quality settings for WebGL
See Also
Section titled “See Also”- Windows Publishing - Full-featured native builds
- Supported Platforms - Platform compatibility matrix
- Improving Performance - Optimization techniques
© 2025 realvirtual GmbH https://realvirtual.io - All rights reserved.