
Scene Selection (Pro)
The Scene Selection system provides interactive runtime object selection with sophisticated visual feedback, allowing operators to inspect components, view live signal states, and interact with simulation elements during virtual commissioning, training, and debugging scenarios.
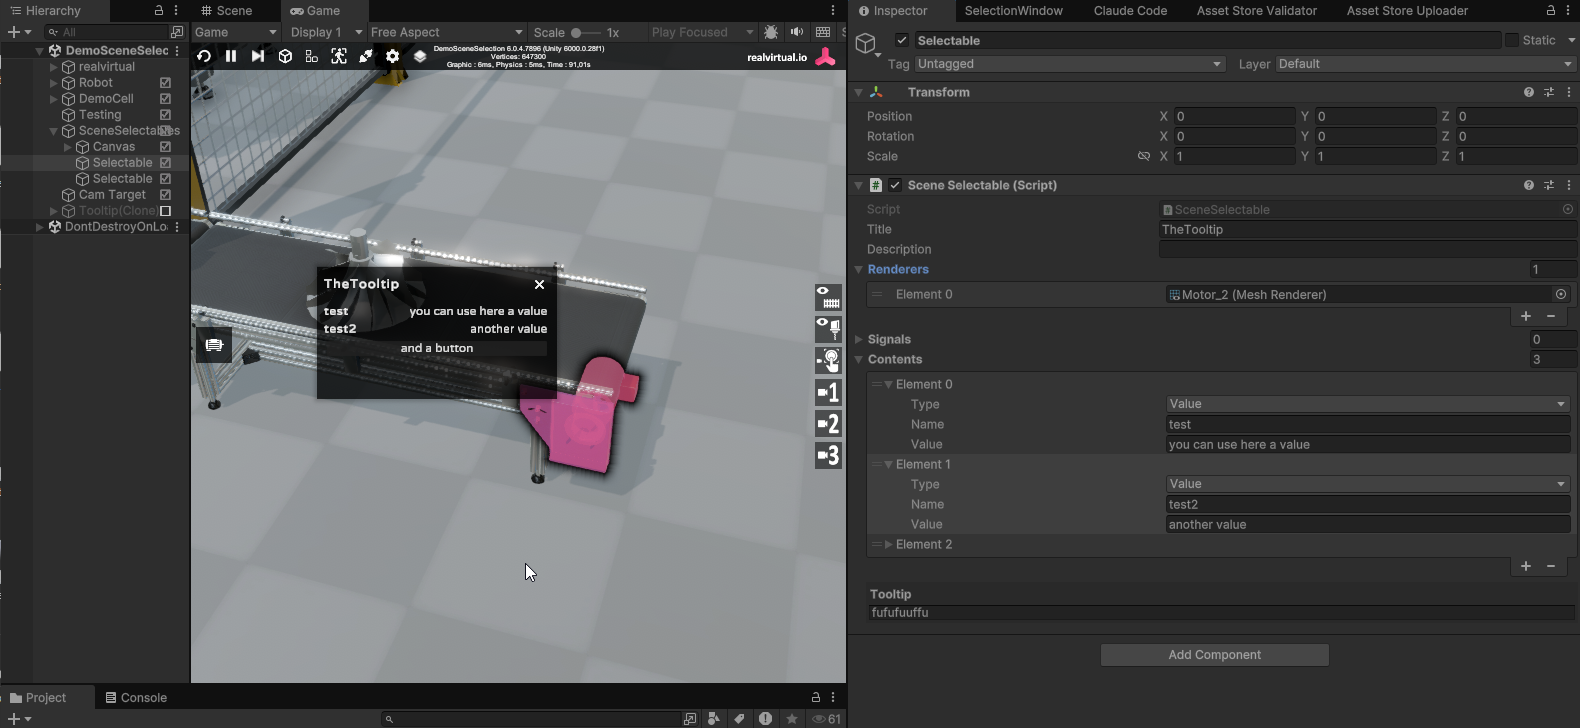
Scene Selection with modern tooltip display and interactive signal window
Overview
Section titled “Overview”Scene Selection transforms static 3D models into interactive elements that users can hover over, click, and inspect during runtime. The system provides multi-layer visual feedback with separate highlighting for hover effects, active states, selections, and change indicators. Each selectable object can display tooltips on hover and detailed information windows when clicked, including live signal states that can be toggled directly from the interface.
Key capabilities include:
- Multi-layer highlighting system with four independent visual states (Active, Hover, Selected, Changed)
- Interactive tooltips that appear on hover with customizable content
- Detailed selection windows showing properties, descriptions, and live signal states
- Signal monitoring and control with toggle switches for real-time manipulation
- Change tracking that highlights objects when their signal states differ from initial values
- Dynamic content system for adding runtime values and clickable links
- Multi-renderer grouping to treat complex models as single selectable units
- Raycast-based interaction with automatic UI avoidance
The system integrates seamlessly with realvirtual’s signal system, allowing you to monitor and control PLCInputBool, PLCOutputBool, and other signal types directly from the selection interface. This makes it invaluable for debugging automation logic, training operators on equipment functions, and creating interactive maintenance procedures.
Setup and Configuration
Section titled “Setup and Configuration”Adding Scene Selection to Your Scene
Section titled “Adding Scene Selection to Your Scene”To implement Scene Selection in your project:
-
Add the prefab: Drag the
SceneSelectablesprefab fromAssets/realvirtual/UIPrefabs/into your scene hierarchy -
Configure the toolbar button: The system automatically adds a toolbar button using the icon specified in the SceneSelectionManager
-
Set up highlighting managers: The prefab comes pre-configured with four highlighting managers that are automatically detected:
- Highlight 1: Active state highlighting
- Highlight 2: Hover effect highlighting
- Highlight 3: Changed state highlighting
- Highlight 4: Selected state highlighting
Creating Selectable Objects
Section titled “Creating Selectable Objects”You can create selectable objects in two ways:
Method 1: Using the Add Selectable Button
- Select the SceneSelectables GameObject in the hierarchy
- Click Add Selectable in the Inspector
- A new SceneSelectable child object is created automatically
- Configure the selectable’s properties in the Inspector
Method 2: Manual Creation
- Create an empty GameObject as a child of SceneSelectables
- Add the SceneSelectable component
- Configure renderers, signals, and content
SceneSelectionManager Properties
Section titled “SceneSelectionManager Properties”The SceneSelectionManager orchestrates all selection interactions and visual feedback:
Selection Managers
Section titled “Selection Managers”Active (AbstractSelectionManager) controls the highlighting for objects in their default active state. This manager applies visual feedback to all selectable objects when the selection system is enabled, providing a base layer of highlighting that indicates which objects are interactive.
Hover (AbstractSelectionManager) manages the hover effect when the mouse cursor moves over a selectable object. This provides immediate visual feedback to users, indicating which object will be selected if clicked. The hover highlighting is automatically removed when the cursor moves away.
Selected (AbstractSelectionManager) handles persistent highlighting for objects that have been clicked and selected. This highlighting remains active until another object is selected or the selection is cleared, providing clear visual indication of the currently inspected object.
Changed (AbstractSelectionManager) highlights objects whose signal states have changed from their initial values. This is particularly useful for debugging and training scenarios, as it immediately shows which components have been manipulated or have changed state during simulation.
UI Configuration
Section titled “UI Configuration”Icon (Sprite) defines the toolbar button icon for enabling/disabling the selection system. This icon appears in both the on and off states of the toolbar button, providing a consistent visual identifier for the selection tool.
Window (GameObject) references the selection window prefab that displays detailed information when an object is selected. This window contains the title, description, signal toggles, and any dynamic content associated with the selected object.
Title (TextMeshProUGUI) points to the text component that displays the selected object’s title in the selection window header. This is automatically updated when an object is selected.
Description (GameObject) contains the panel for displaying detailed descriptions. The panel is automatically shown or hidden based on whether the selected object has a description defined.
Tooltip (GameObject) references the tooltip prefab that appears on hover. The tooltip automatically sizes itself to fit the content and follows the mouse cursor position.
UI Prefabs
Section titled “UI Prefabs”Value Prefab (GameObject) defines the template for displaying property values in the selection window. This prefab is instantiated for each value-type content item, showing a label and value pair.
Button Prefab (GameObject) provides the template for creating interactive link buttons in the selection window. These buttons can open URLs, documentation, or trigger other actions when clicked.
SceneSelectable Properties
Section titled “SceneSelectable Properties”Basic Information
Section titled “Basic Information”Title (string) sets the header text displayed in the selection window. This should be a clear, concise name that identifies the component or system being selected. For example: “Conveyor Motor M1” or “Safety Door Sensor”.
Description (string) provides detailed information about the selected object. This text appears in an expandable panel within the selection window and can include operational details, specifications, or usage instructions. The description panel automatically hides if no text is provided.
Tooltip (string) defines the hover text that appears when the mouse cursor is over the object. Tooltips are edited through a custom text area in the Inspector and support multi-line content. Use tooltips to provide quick identification or status information without requiring a full selection.
Visual Configuration
Section titled “Visual Configuration”Renderers (List
Signal Integration
Section titled “Signal Integration”Signals (List
- PLCInputBool for input signals
- PLCOutputBool for output signals
- PLCInputFloat and PLCOutputFloat for analog signals
- Custom signal implementations
Dynamic Content
Section titled “Dynamic Content”Contents (List
Usage Examples
Section titled “Usage Examples”Basic Setup Example
Section titled “Basic Setup Example”Here’s how to set up a simple selectable conveyor motor:
// Configure in Inspector or via scriptSceneSelectable motorSelectable = conveyorMotor.AddComponent<SceneSelectable>();motorSelectable.SetTitle("Conveyor Drive Motor M1");motorSelectable.description = "Main drive motor for conveyor section 1\n" +                              "Power: 5.5 kW\n" +                              "Speed: 0-1450 RPM";motorSelectable.tooltip = "Motor M1 - Click for details";
// Add the motor's mesh renderersmotorSelectable.renderers.Add(motorBody.GetComponent<MeshRenderer>());motorSelectable.renderers.Add(motorFan.GetComponent<MeshRenderer>());
// Link motor control signalsmotorSelectable.signals.Add(motorRunSignal);motorSelectable.signals.Add(motorFaultSignal);motorSelectable.signals.Add(motorSpeedSignal);
Adding Dynamic Content
Section titled “Adding Dynamic Content”You can add runtime information to selectables:
public class MotorMonitor : MonoBehaviour{    private SceneSelectable selectable;    private float runtime = 0;
    void Start()    {        selectable = GetComponent<SceneSelectable>();
        // Add static information        selectable.AddStringContent("Serial Number", "MTR-2024-0156");        selectable.AddStringContent("Installation Date", "2024-03-15");
        // Add documentation link        selectable.AddLinkContent("View Manual",            "https://doc.realvirtual.io/motors/m1-series");
        // Add maintenance link        selectable.AddLinkContent("Maintenance Schedule",            "https://maintenance.local/motor/M1");    }
    void Update()    {        runtime += Time.deltaTime;
        // Update runtime display        selectable.ClearContent();        selectable.AddStringContent("Runtime",            $"{runtime:F1} hours");        selectable.AddStringContent("Temperature",            $"{GetMotorTemp():F1}°C");    }}
Tooltip Configuration
Section titled “Tooltip Configuration”Tooltips are configured through the custom Inspector interface:
- Select a SceneSelectable object
- In the Inspector, find the Tooltip section at the bottom
- Enter multi-line tooltip text in the text area
- The tooltip automatically appears on hover during runtime
Example tooltip content:
Safety Door SD-01Status: ClosedInterlock: ActiveLast opened: 10:45 AMSignal Monitoring Example
Section titled “Signal Monitoring Example”Here’s how the selection system integrates with signals for a sensor:
public class SensorSelectable : MonoBehaviour{    public PLCInputBool sensorActive;    public PLCInputBool sensorFault;    public PLCOutputBool sensorReset;
    void Start()    {        SceneSelectable selectable = GetComponent<SceneSelectable>();
        // Add signals for monitoring        selectable.signals.Add(sensorActive);        selectable.signals.Add(sensorFault);        selectable.signals.Add(sensorReset);
        // Set descriptive title        selectable.SetTitle($"Proximity Sensor {gameObject.name}");
        // Add diagnostic information        selectable.AddStringContent("Type", "Inductive");        selectable.AddStringContent("Range", "8mm");        selectable.AddStringContent("Output", "PNP NO");    }}
Advanced Features
Section titled “Advanced Features”Multi-Layer Highlighting System
Section titled “Multi-Layer Highlighting System”The four-layer highlighting system provides sophisticated visual feedback:
- Base Layer (Active): Shows all interactive objects when the selection system is enabled
- Hover Layer: Provides immediate feedback as the cursor moves
- Selection Layer: Persists to show the currently inspected object
- Change Layer: Overlays objects that have been modified
These layers work together to create an intuitive interaction experience. For example, a motor might show:
- Active highlighting (blue outline) indicating it’s selectable
- Hover highlighting (yellow glow) when the mouse is over it
- Selection highlighting (green outline) when clicked
- Change highlighting (red pulse) if its signals have been toggled
Change Tracking
Section titled “Change Tracking”The system automatically tracks signal changes:
// Initial state is captured automatically on Start()// When signals change, the Changed highlight manager activates// This happens automatically - no code required
// To reset change tracking programmatically:void ResetChangeTracking(){    SceneSelectionManager manager = FindObjectOfType<SceneSelectionManager>();    manager.RefreshActives(); // Re-evaluates all change states}
Custom Selection Behavior
Section titled “Custom Selection Behavior”You can extend selection behavior by responding to selection events:
public class CustomSelectable : MonoBehaviour{    private SceneSelectable selectable;
    void Start()    {        selectable = GetComponent<SceneSelectable>();    }
    void Update()    {        // Check if this object is currently selected        SceneSelectionManager manager =            GetComponentInParent<SceneSelectionManager>();
        if (manager.selectedSelectable == selectable)        {            // Perform actions while selected            UpdateRealtimeData();        }    }
    void UpdateRealtimeData()    {        // Update dynamic content while selected        selectable.ClearContent();        selectable.AddStringContent("Speed",            $"{GetCurrentSpeed():F1} m/s");        selectable.AddStringContent("Position",            $"{transform.position}");    }}
Programmatic Selection Control
Section titled “Programmatic Selection Control”You can control the selection system through code:
public class SelectionController : MonoBehaviour{    private SceneSelectionManager selectionManager;
    void Start()    {        selectionManager = FindObjectOfType<SceneSelectionManager>();    }
    public void EnableSelection()    {        selectionManager.Activate();    }
    public void DisableSelection()    {        selectionManager.Deactivate();    }
    public void ClearSelection()    {        selectionManager.CloseWindow();    }
    public void RefreshHighlighting()    {        selectionManager.RefreshActives();    }}
API Reference
Section titled “API Reference”SceneSelectionManager Methods
Section titled “SceneSelectionManager Methods”Activate() enables all child SceneSelectable components and applies initial highlighting. Call this to turn on the selection system programmatically.
Deactivate() disables all child SceneSelectable components, removes highlighting, and closes any open windows. Use this to turn off the selection system.
RefreshActives() re-evaluates the active/changed state of all selectables based on current signal values. This updates the highlighting to reflect any changes since initialization.
CloseWindow() closes the current selection window and clears the selection highlighting. The selected object reference is also cleared.
AddSelectable() creates a new SceneSelectable child GameObject. This Editor method provides a quick way to add selectables through the Inspector.
SceneSelectable Methods
Section titled “SceneSelectable Methods”SetTitle(string title) sets the display title for the selection window header.
AddStringContent(string name, string value) adds a text value display to the selection window. The name appears as a label, and the value is shown alongside it.
AddLinkContent(string name, string url) adds a clickable button that opens the specified URL. Use this for documentation links, external resources, or web-based tools.
ClearContent() removes all dynamically added content items. Signal displays are not affected.
Activate() enables this selectable object, creating the necessary SelectablePart components and applying initial highlighting.
Deactivate() disables this selectable object, removing SelectablePart components and clearing all highlighting.
Hover() applies hover highlighting to all associated renderers and shows the tooltip if configured.
UnHover() removes hover highlighting and hides the tooltip.
Click() handles selection, toggling the selection state and opening or closing the information window.
HasTooltip() returns true if a tooltip is configured for this selectable.
RefreshActive(SceneSelectionManager manager) updates the visual state based on current signal values compared to initial state.
SceneSelectableContent Structure
Section titled “SceneSelectableContent Structure”The SceneSelectableContent class defines additional information items:
public class SceneSelectableContent{    public enum Type    {        Value,  // Text display        Link    // Clickable URL button    }
    public Type type;   // Content type    public string name; // Display label    public string value; // Text or URL}
Performance Considerations
Section titled “Performance Considerations”Raycast Optimization
Section titled “Raycast Optimization”The system uses Physics.RaycastAll for accurate multi-layer detection. To optimize performance:
- Place selectable objects on specific layers
- Use layer masks in physics settings to exclude unnecessary objects
- Limit the number of active selectables in dense scenes
Highlighting Performance
Section titled “Highlighting Performance”Each highlighting manager can impact rendering performance:
- Use simple outline shaders for better performance
- Limit the number of simultaneous highlight effects
- Consider LOD settings for complex models
- Disable highlighting for objects outside the camera view
Signal Updates
Section titled “Signal Updates”Signal monitoring happens continuously during runtime:
- Limit the number of signals per selectable (recommend < 10)
- Use efficient signal implementations
- Consider update frequencies for real-time data
- Cache signal references to avoid lookups
Unity 6 Compatibility
Section titled “Unity 6 Compatibility”When upgrading projects to Unity 6, the Render Graph compatibility mode must be disabled for highlighting to work correctly:
- Open Edit > Project Settings
- Navigate to Graphics
- Find Render Graph Settings
- Disable Compatibility Mode
- Restart Unity Editor
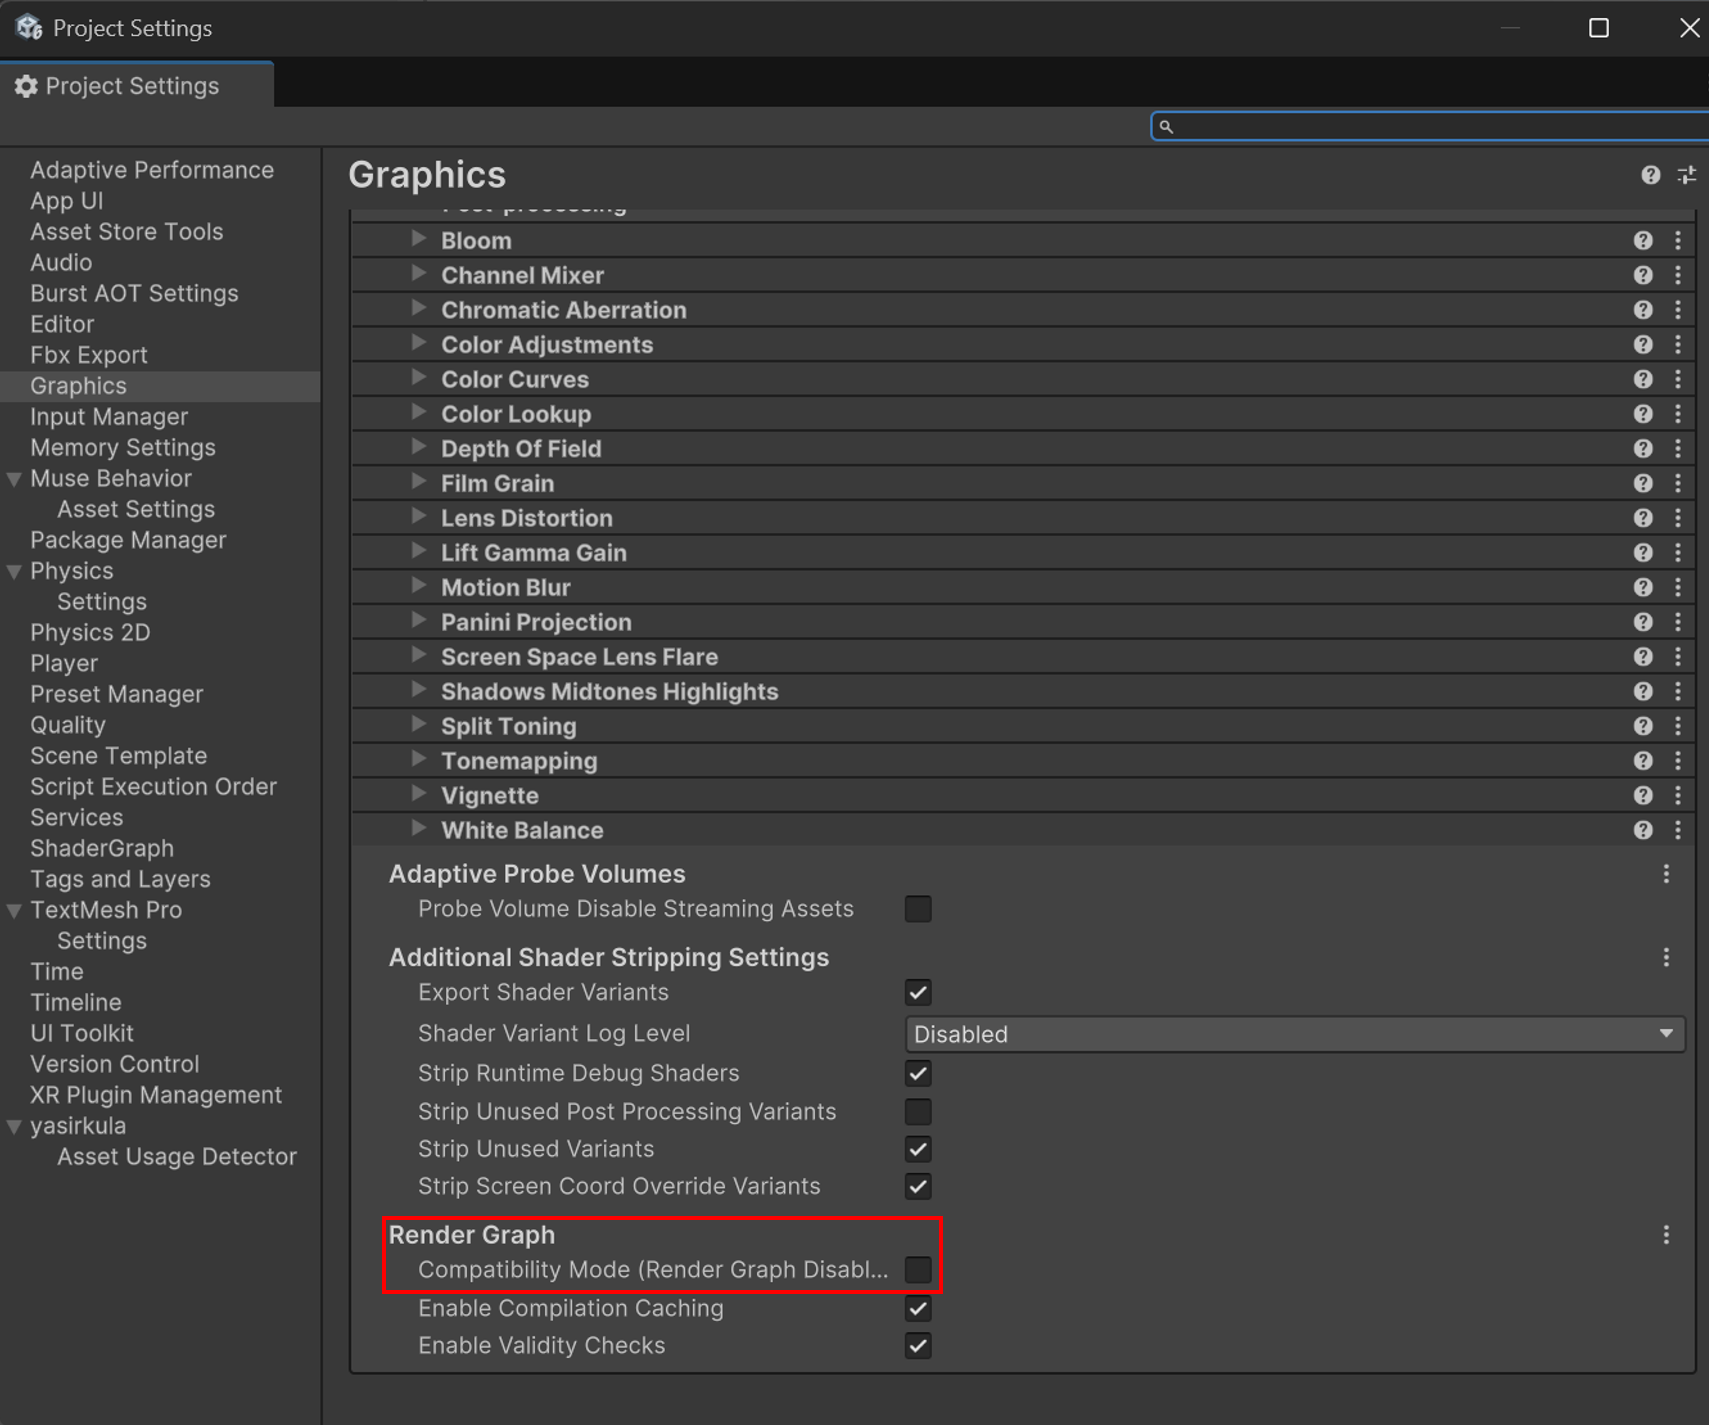
Disable Compatibility Mode in Graphics settings for proper highlighting
This setting ensures that the highlighting shaders work correctly with Unity 6’s rendering pipeline.
CMCViewR Compatibility
Section titled “CMCViewR Compatibility”When deploying realvirtual projects to CMCViewR, Scene Selectables have the following restrictions:
Scene Selectables Not Supported
Section titled “Scene Selectables Not Supported”Scene Selectables are not compatible with CMCViewR and will not function in exported CMCViewR scenes. The interactive selection system, highlighting, tooltips, and selection windows are editor/runtime Unity features that do not translate to the CMCViewR environment.
If you need interactive object selection in CMCViewR, you will need to implement alternative interaction methods compatible with the CMCViewR runtime.
Custom Script Requirements
Section titled “Custom Script Requirements”When using custom scripts in projects that will be exported to CMCViewR, all custom code must be placed in its own custom assembly definition. This is a CMCViewR requirement for proper script compilation and deployment.
To create a custom assembly definition for your scripts:
- Create a new folder for your custom scripts (e.g.,
Assets/CustomScripts/) - Right-click in the folder and select Create > Assembly Definition
- Name the assembly (e.g.,
MyProject.Custom) - In the Assembly Definition Inspector:
- Add references to
realvirtualand any other required assemblies - Configure platform compatibility as needed
- Add references to
- Place all your custom scripts within this folder
Example assembly definition setup:
{ "name": "MyProject.Custom", "references": [ "realvirtual.base", "Unity.TextMeshPro" ], "includePlatforms": [], "excludePlatforms": []}Camera Handling
Section titled “Camera Handling”When exporting to CMCViewR, you do not need to manually prepare or deactivate realvirtual cameras. The realvirtual camera system will be automatically deactivated when the scene runs in CMCViewR, as CMCViewR uses its own camera management system.
Integration with Other Components
Section titled “Integration with Other Components”Scene Selection integrates seamlessly with other realvirtual components:
Drive Integration
Section titled “Drive Integration”Selectable drives can display current position, speed, and control signals:
selectable.signals.Add(drive.JogForward);selectable.signals.Add(drive.JogBackward);selectable.AddStringContent("Position", $"{drive.CurrentPosition:F2} mm");Sensor Integration
Section titled “Sensor Integration”Sensors can show detection states and configuration:
selectable.signals.Add(sensor.Occupied);selectable.AddStringContent("Detection Range", $"{sensor.Range} mm");Transport System Integration
Section titled “Transport System Integration”Conveyors and transport systems benefit from selection for debugging:
selectable.signals.Add(conveyor.Running);selectable.signals.Add(conveyor.EmergencyStop);selectable.AddStringContent("Speed", $"{conveyor.Speed:F1} m/s");Troubleshooting
Section titled “Troubleshooting”Highlighting Not Visible
Section titled “Highlighting Not Visible”- Verify Render Graph Compatibility Mode is disabled (Unity 6)
- Check that highlighting managers are assigned in SceneSelectionManager
- Ensure renderers have materials that support highlighting shaders
- Verify the Highlighter prefab exists in the scene hierarchy
Tooltips Not Appearing
Section titled “Tooltips Not Appearing”- Check that tooltip text is configured in the Inspector
- Verify the Tooltip GameObject is assigned in SceneSelectionManager
- Ensure EventSystem exists in the scene for UI interaction
- Check that Canvas render mode supports world space tooltips
Signals Not Updating
Section titled “Signals Not Updating”- Verify signals are properly initialized before adding to selectable
- Check that signal GameObjects are active in the hierarchy
- Ensure PLCInterface or signal source is running
- Verify signal references are not null
Selection Window Issues
Section titled “Selection Window Issues”- Check Window GameObject is assigned in SceneSelectionManager
- Verify UI Canvas and EventSystem are present
- Ensure window prefab has required components (RectTransform, CanvasGroup)
- Check that text components use TextMeshPro
Best Practices
Section titled “Best Practices”-
Group Related Renderers: Combine parts of the same component into a single selectable for cleaner interaction
-
Use Descriptive Titles: Make titles clear and include identifying information (e.g., “Motor M1” not just “Motor”)
-
Provide Helpful Tooltips: Include status information in tooltips for quick inspection without selection
-
Limit Signal Count: Keep signal lists focused on the most relevant controls (5-10 signals maximum)
-
Add Context Links: Include links to documentation, datasheets, or maintenance procedures
-
Update Dynamic Content Sparingly: Only update runtime values when selected to reduce overhead
-
Use Consistent Highlighting: Maintain consistent colors across your application for each highlighting state
-
Test Performance: Profile selection interactions in complex scenes and optimize as needed
See Also
Section titled “See Also”- Signals - Signal system for PLC communication
- UI System - User interface components and controls
- Highlighting System - Visual feedback and highlighting
- Drive - Drive components that integrate with selection
- Sensor - Sensor components for detection and monitoring