
Multiplayer (Pro, Deprecated)
Real-time collaborative industrial automation simulation with support for multiple users and VR/AR integration.
Overview
Section titled “Overview”The realvirtual Professional Multiplayer system enables multiple users to simultaneously interact with the same virtual commissioning scenario. Built on Unity Netcode for GameObjects with Unity Relay Service, it provides synchronized automation components, real-time material flow, and collaborative design review capabilities.
Key Features
Section titled “Key Features”- Multi-user Collaboration: Scalable concurrent users in the same simulation
- Real-time Synchronization: All automation components (Drives, Sensors, MUs, Sources) synchronized across clients
- VR/AR Support: Full XR controller tracking and avatar representation
- Industrial Integration: PLC signal synchronization and automation logic sharing
- Cloud-based Connection: Unity Relay Service for secure peer-to-peer connections
System Requirements
Section titled “System Requirements”Unity Packages
Section titled “Unity Packages”- Unity Netcode for GameObjects: Core networking framework
- Unity Transport (UTP): Network transport layer with DTLS encryption
- Unity Services Core: Authentication and Unity Services integration
- XR Interaction Toolkit (optional): For VR/AR functionality
1. Unity Services Configuration
Section titled “1. Unity Services Configuration”- Enable Unity Services in Project Settings → Services
- Create Unity Project ID or link to existing project
- Enable Relay Service in Unity Dashboard → Multiplayer → Relay
- Enable Authentication for anonymous user sessions
2. Scene Setup
Section titled “2. Scene Setup”- Add the Multiplayer Prefab to your scene from the realvirtual Professional package
- The prefab contains all necessary components: NetworkManager, RelayConnectionManager, NetworkInitializer, and MultiuserWindow
- All network prefabs are pre-configured and registered automatically
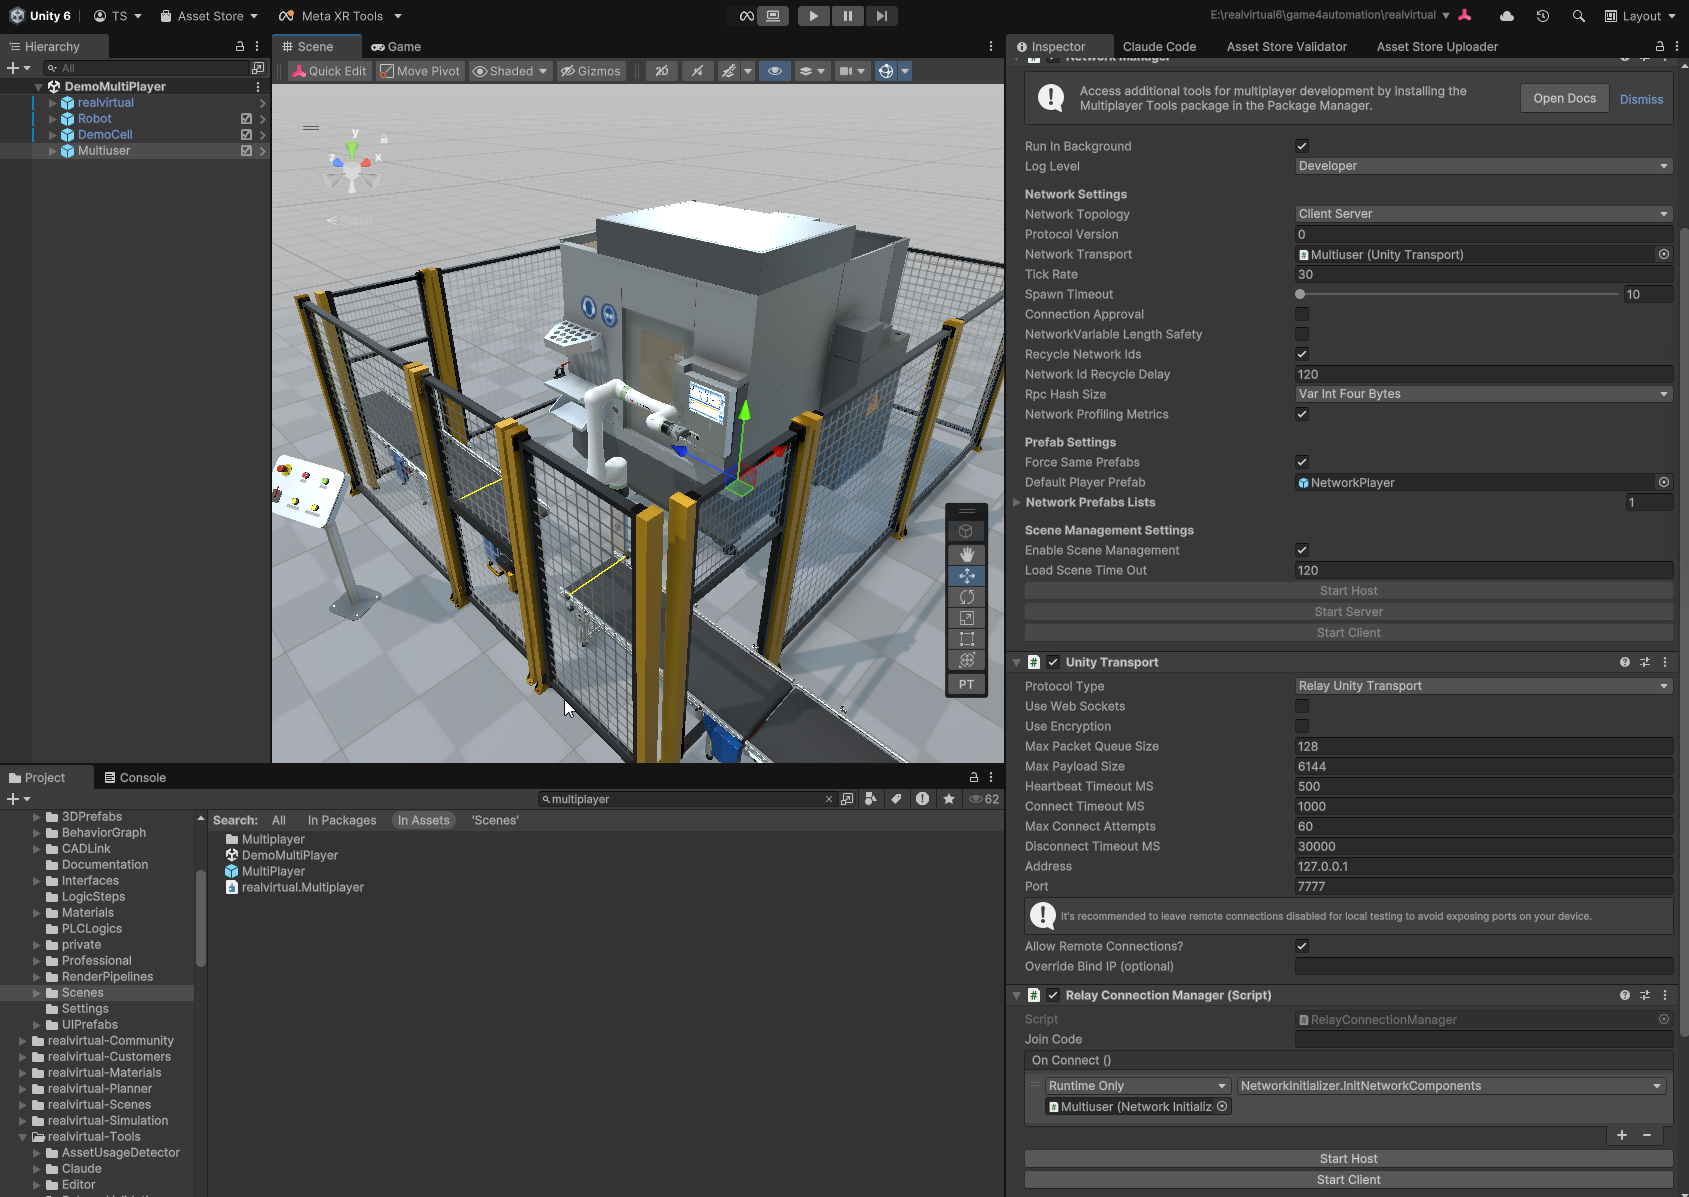
NetworkManager configuration showing Unity Transport settings, Relay Connection Manager, and network prefab registration
3. Automation Component Setup
Section titled “3. Automation Component Setup”The system automatically creates networked versions of:
- Drives: Position and speed synchronization
- Sensors: Occupancy state synchronization
- MUs (Moving Units): Transform and identity synchronization
- Sources: Material generation events
- Signals: PLC signal values and states
Starting a Host Session
Section titled “Starting a Host Session”- Open Multiuser Window via realvirtual → UI toolbar
- Enter Player Name (stored locally)
- Click “Host” to create session
- Share Join Code with other users
Joining as Client
Section titled “Joining as Client”- Open Multiuser Window
- Enter Player Name
- Input Join Code received from host
- Click “Client” to join session
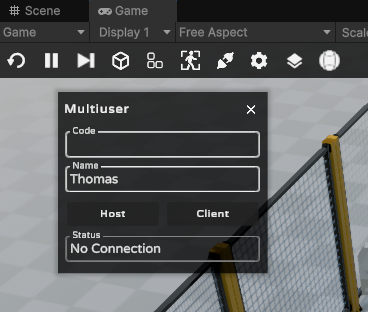
Multiuser window showing Code input field, Name field, and Host/Client connection buttons with status display
Connection Status
Section titled “Connection Status”- Connected: Successfully connected to multiplayer session
- No Connection: Not connected or connection failed
Synchronized Components
Section titled “Synchronized Components”NetworkDrive
Section titled “NetworkDrive”- Position Values: Current drive positions
- Speed Values: Current drive speeds
- Authority: Host controls drives, clients receive updates
- Override Mode: Clients use PositionOverwrite and SpeedOverwrite
NetworkMU (Moving Units)
Section titled “NetworkMU (Moving Units)”- Transform: Position and rotation
- Identity: LocalID, GlobalID, Name
- Physics: Host maintains physics authority, clients use kinematic mode
- Source Tracking: References to creating Source component
NetworkSensor
Section titled “NetworkSensor”- Occupancy State: Boolean occupied/free status
- Network Mode: Clients automatically switch to network-controlled mode
- Real-time Updates: Immediate sensor state propagation
NetworkSignal
Section titled “NetworkSignal”- Signal Values: All PLC signal types (PLCInputBool, PLCOutputFloat, etc.)
- Bidirectional: Host-to-client signal synchronization
- String-based: Universal value representation
NetworkPlayer
Section titled “NetworkPlayer”- Player Names: Persistent player identification
- XR Controllers: Left and right controller position/rotation sync
- Avatar Visibility: First-person view (own avatar hidden)
- Camera Tracking: Remote user viewpoint synchronization
VR/AR Integration
Section titled “VR/AR Integration”XR Setup
Section titled “XR Setup”- Install XR Interaction Toolkit
- Configure XR Controllers as “LeftController” and “RightController” Groups
- Enable XR Support in realvirtual-XR package
- Test Controller Tracking before multiplayer sessions
Supported VR Systems
Section titled “Supported VR Systems”- Meta Quest 2/3: Fully tested with Touch controllers
- Other OpenXR Devices: Compatible through Unity XR system
- Mixed Reality: Combine VR users with desktop users
Performance Considerations
Section titled “Performance Considerations”Network Optimization
Section titled “Network Optimization”- Change Detection: Only synchronizes data when values change
- Update Frequency: FixedUpdate (50Hz) for smooth synchronization
- Interpolation: Client-side smooth movement for controllers
- Authority Model: Host maintains physics, clients display only
Best Practices
Section titled “Best Practices”- Monitor Simultaneous MUs: High MU counts can impact network performance depending on bandwidth
- Use Appropriate Update Rates: Balance responsiveness with bandwidth (50Hz default)
- Test Network Conditions: Verify performance under realistic network latency
- Monitor Connection Quality: Use Unity Profiler for network analysis
- Unity Transport Configuration: Use default settings for optimal Relay performance
Troubleshooting
Section titled “Troubleshooting”Connection Issues
Section titled “Connection Issues”- Unity Services Authentication: Verify anonymous authentication is enabled in Project Settings → Services
- Relay Allocation: Check Unity Dashboard for Relay service status and CCU limits
- Firewall Settings: Ensure UDP traffic is allowed (Unity Transport uses UDP)
- Join Code Validity: Join codes expire after a timeout period (typically 10 minutes)
- Package Installation: Verify Unity Netcode for GameObjects is properly installed
Synchronization Problems
Section titled “Synchronization Problems”- Network Prefabs: Verify all automation components have corresponding network prefabs
- Scene Path Resolution: Check that GameObject hierarchy matches between clients
- Authority Conflicts: Ensure only host modifies authoritative data
- Physics Conflicts: Verify client MUs are using kinematic rigidbodies
Performance Issues
Section titled “Performance Issues”- Bandwidth Usage: Monitor network traffic in Unity Profiler
- Update Frequency: Reduce FixedUpdate rate if needed
- Object Count: Limit number of synchronized objects
- Connection Stability: Test with realistic network conditions
API Integration
Section titled “API Integration”Custom Component Synchronization
Section titled “Custom Component Synchronization”To synchronize custom automation components:
public class CustomNetworkComponent : NetworkBehaviour{    [SerializeField] private NetworkVariable<float> customValue = new NetworkVariable<float>();
    public override void OnNetworkSpawn()    {        if (IsHost)        {            // Initialize host-controlled values            customValue.Value = GetComponentValue();        }    }
    private void FixedUpdate()    {        if (IsHost)        {            // Update network variable when value changes            float newValue = GetComponentValue();            if (Math.Abs(customValue.Value - newValue) > 0.001f)            {                customValue.Value = newValue;            }        }        else        {            // Apply received values on clients            ApplyNetworkValue(customValue.Value);        }    }}
See Also
Section titled “See Also”- Industrial Metaverse - VR/AR setup and configuration
- Drive Components - Synchronized drive systems
- Sensors - Networked sensor components
- MU System - Moving unit synchronization
- Interfaces - PLC communication in multiplayer scenarios