
Attach and Run an FMU
An FMU (Functional Mock-up Unit, FMI 2.0 Co-Simulation) is a simulation model packaged as a .fmu file — a hydraulic axis, a thermal model, a controller exported from Modelica, Simulink or a similar tool. In realvirtual you attach the FMU to a node of your model. Its inputs and outputs then appear as signals below that node, and any component that can use a PLC signal can use them: a drive that follows an FMU output, a lamp that shows one, a button that writes an FMU input.
The FMU travels inside the GLB. Saving, sharing and reloading the model keeps it — no separate file to hand around.
Requirements
Section titled “Requirements”- realvirtual CONNECT on a Windows x64 machine. The browser never executes an FMU — CONNECT runs it and streams the values to the viewer. Without CONNECT the model still loads; the FMU just does not run (see Without CONNECT).
- The viewer must be connected to that CONNECT as its live data source.
- The FMU must be FMI 2.0 Co-Simulation and contain a win64 binary (
binaries/win64/<model>.dll). Anything else is refused when you attach it, with the reason.
Attaching an FMU
Section titled “Attaching an FMU”FMUs are attached in the Editor:
- Open the asset in the Editor
- Right-click the node the FMU belongs to — in the 3D view or in the hierarchy — and choose FMU anhängen…
- Pick the
.fmufile. The editor reads the model description in the browser (nothing is uploaded yet) and shows the model name, GUID and variables in the Inspector - Save the asset — the FMU is now part of the GLB
Attaching is one undoable step, like every editor change. FMU entfernen in the same context menu removes it again. A node that already carries an FMU gets the new one in place, keeping its step size and tolerance.
Signals below the FMU node
Section titled “Signals below the FMU node”For every supported variable, the viewer creates a signal below the FMU node:
Ball└── Signals ├── h Ball.h (output → read by the viewer) ├── v Ball.v (output) ├── e Ball.e (tunable parameter → written by the viewer) └── Restart Ball.Restart (restart control, see below)- The row name in the hierarchy is the FMI variable name; the signal name is
<node>.<variable>, so two FMUs with the same variable never collide. In a layout, the placement name is added in front, like for every signal. - Outputs (and calculated parameters) come from the FMU and are read-only in the viewer. Inputs and tunable parameters are written by the viewer — by you in the signal list, or by a component bound to them. They start at the FMU’s start values.
- Real becomes a float signal, Integer and Enumeration an integer signal, Boolean a bool signal.
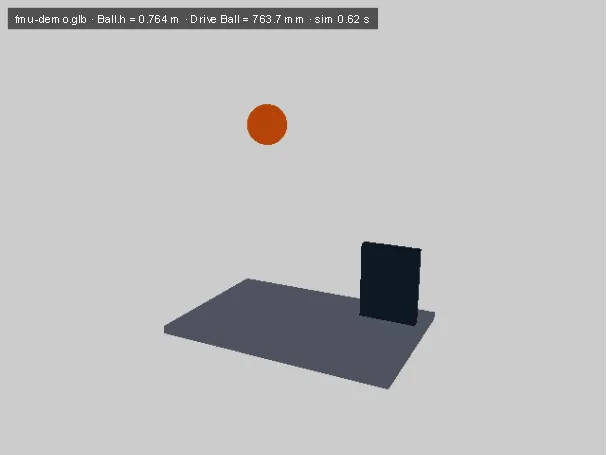
Bind these signals like any other: in the demo model, the ball’s Drive Follow Position points at Ball/Signals/h, so the drive position follows the FMU output. The FMU calculates metres, a drive moves in millimetres — the viewer handles that difference for you, see the next section.
Units and automatic scaling
Section titled “Units and automatic scaling”Every FMU signal carries the unit its model declares (m, m/s, rad, …). You see it as a chip behind the signal name in the picker and as a Unit line in the signal tooltip. Drive behaviors, on the other hand, work in millimetres and degrees. When you bind a signal with a known unit to a slot that has a scale field — for example Ball.h (m) to Drive Follow Position › Position — the viewer computes the conversion factor and writes it into that scale field (Scale = 1000 for m → mm). The factor is a normal field value: it is visible in the Inspector, undoable together with the binding, and yours to change.
A small icon next to the scale field tells you where the value comes from:
| Icon | Meaning |
|---|---|
| link | The value is the automatic factor (×1000 from unit m → mm) |
| link off | You changed the value by hand. The tooltip names the automatic factor; a click sets it back |
| warning | The units do not fit (for example rad to a linear drive), the unit is unknown to the viewer, two slots share the field with different factors, or the behavior does not apply the field (ScaleFeedbackPosition off). The binding exists, the field is left as it is, and the Problems panel explains what to do |
The viewer never overwrites a value you typed yourself. Rebinding a slot recalculates the factor only while the field still holds the previous automatic value. Rotary drives get degrees instead of millimetres; the slot’s unit follows the drive’s Direction.
Units come from the FMU’s modelDescription.xml. Model-specific unit names that are not in the viewer’s built-in table (metres, millimetres, radians, degrees and their speeds and accelerations) are resolved through the FMU’s own UnitDefinitions, which the viewer stores on the FMU node when the package is attached. Signals from PLCs and other interfaces carry no unit yet, so binding them changes nothing — the scale field stays as it was. Placed layout assets are not scaled automatically either; the Problems panel shows the factor to enter by hand.
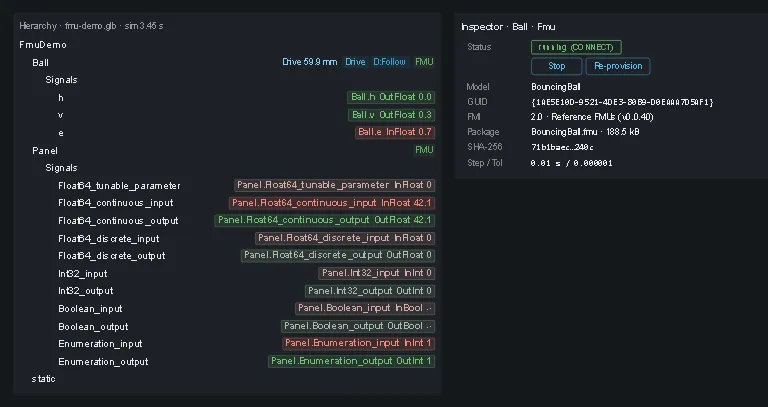
The Inspector of an FMU node shows its state, model, GUID, generator, package size and SHA-256, step size and tolerance. The FMU badge in the hierarchy takes the colour of the state:
| State | Meaning |
|---|---|
| standalone | No CONNECT connection — the signals show start values |
| needs trust | CONNECT holds the FMU but waits for your consent |
| starting / running | CONNECT runs the FMU; values are live |
| error | CONNECT could not start or run it — the message is in the Inspector and the Problems panel |
| unsupported | No FMU package on the node, or its bytes are missing from the file |
Stop ends the FMU run for this browser tab; Re-provision sets it up again in CONNECT. While the FMU runs, the line Run shows start #<n> · t = <s> s: how often CONNECT has started this instance and the simulation time since the last start.
Change parameters
Section titled “Change parameters”The Inspector of an FMU node has a section Inputs & Parameter with one row per input and parameter you may change: the variable’s description (or name), its unit, and an editor that fits its type — a number field, a checkbox, or a dropdown with the names of an enumeration.
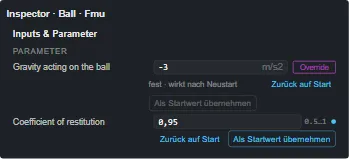
- Change a value and it goes to the running FMU at once. A number is kept inside the range the FMU declares (for example
0.5…1); the range is shown next to the field. - Als Startwert übernehmen stores the current value as the variable’s start value in the model. From now on the FMU starts with it — after a reload, in another browser, on another CONNECT. The row shows an Override badge.
- Zurück auf Start removes the stored start value and sets the variable back to the start value of the FMU itself.
- A dot marks a value that differs from the start value; the badge marks a stored start value. Both are independent: you can try a value live without storing it.
- Storing a start value is an ordinary edit: Undo takes it back, and it is saved with the model.
Some parameters are fixed: the FMU reads them only while it starts (the gravity g of the BouncingBall, for example). Their row says fest · wirkt nach Neustart. You edit the value first, then Als Startwert übernehmen stores it — and the FMU restarts automatically with the new value. Nothing is sent while you type.
Not every variable has a row: outputs, constants and calculated parameters cannot be changed, and string variables are not supported.
If the FMU node has Allow Viewer To Fmu switched off, the live editors are locked (a hint says so) — you can still store start values, and CONNECT applies them when the FMU starts. Without a CONNECT connection the rows stay editable, but only stored start values have an effect later.
Restart the FMU
Section titled “Restart the FMU”An FMU restart puts the model back to its start values — the ball is lifted to its start height and falls again. There are three ways:
- Reset (the Reset button or Shift+R) restarts every running FMU whose Restart On Reset is on (the default). Switch it off in the Inspector to keep an FMU running through a reset.
- Storing a fixed parameter restarts it (see above).
- The
Restartsignal below the FMU node: when it changes from off to on, the FMU restarts, and the signal goes back to off by itself. Anything that can write a bool signal can use it — a button, a PLC, or a LogicStep.
Restart from a LogicStep
Section titled “Restart from a LogicStep”To restart an FMU regularly, add a sequence of two LogicSteps:
Sequence LogicStep_SerialContainer (top level: runs in a loop)├── RestartBall LogicStep_SetSignalBool Signal = Ball/Signals/Restart, Set To True└── Wait LogicStep_Delay Duration = 12 s (the ball starts with e = 0.95 as a saved start value)The sequence switches Restart on, waits four seconds, and starts over — so the FMU restarts every four seconds. Change Duration in the Inspector of Wait and the new interval applies at once.
A restart takes a moment. While one is under way — and during the first second after the FMU runs again — further restart requests are ignored, so a very short Duration cannot flood CONNECT with restarts.
Reset restarts the sequence from its first step, so the FMU keeps restarting every four seconds after a reset too. The sequence’s first restart request usually arrives while the reset’s own restart is still under way and is ignored; the next one follows after Duration.
The consent dialog — and why it exists
Section titled “The consent dialog — and why it exists”An FMU contains native code. CONNECT runs it inside its own process, with the rights of the CONNECT service. A faulty or malicious FMU can therefore crash the gateway or do anything that process may do. That is why nothing runs without your explicit consent:
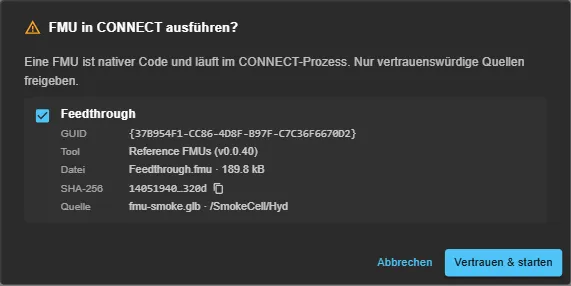
- The first time a model with an FMU opens against a CONNECT, the viewer uploads the package and asks. Vertrauen & starten starts it; Abbrechen leaves it stopped (you can start it later from the Inspector).
- Consent is given per FMU package (identified by its SHA-256) and per CONNECT installation. A changed FMU is a new package and asks again. There is no “trust everything” switch.
- Once given, later loads of the model start the FMU automatically.
- Only attach FMUs from sources you trust.
- Consent is only accepted from a page CONNECT knows:
localhost, the machine’s IP,https://web.realvirtual.io, or an origin listed inAllowedOriginsof CONNECT’sappsettings.json. If the viewer runs on your own web address, add it there and restart CONNECT — otherwise Vertrauen & starten is refused.
Without CONNECT
Section titled “Without CONNECT”In a browser without a CONNECT connection — a shared link, the public demo, a static deployment — the model loads normally and the FMU nodes show their signals with start values. Nothing is calculated. The Problems panel lists the FMU as not runnable (info). The same happens when the viewer is connected to Unity instead of CONNECT: Unity does not run FMUs attached in the web editor.
Several instances
Section titled “Several instances”Every FMU node is its own instance with its own state — also the same FMU used twice, or an asset with an FMU placed several times in a layout. Each browser tab keeps its instances alive in CONNECT; when the last tab using an instance closes, CONNECT stops it within about a minute.
Try it: the FMU demo
Section titled “Try it: the FMU demo”The demo project contains the document FMU Demo (BouncingBall):
- Ball carries the BouncingBall FMU. Its output
hdrives the ball’s height through a drive — connect to CONNECT, confirm the dialog, and the ball drops and bounces. - Sequence restarts the ball every four seconds through
Ball.Restart, as described in Restart from a LogicStep. - Try the parameters: set Coefficient of restitution
eto0.95and the ball bounces almost back to its start height; storeg = -3as a start value and it falls slowly, like on another planet.
The FMU is the unmodified Modelica Reference FMU BouncingBall v0.0.40 (BSD 2-clause license).
Known limits
Section titled “Known limits”- String variables get no signal. The Inspector lists them as not supported.
- One instance per process: some FMUs allow only one instance in a process. A second instance of such an FMU reports an error (restarting CONNECT clears it).
- No FMU-to-FMU coupling yet: an FMU exchanges values with realvirtual signals only. To feed one FMU’s output into another, route it through a component or a PLC.
- Windows x64 only: CONNECT on Linux or ctrlX does not run FMUs.
- FMI 3.0 and Model Exchange FMUs are not supported.